
A Wet Ceiling Is More Urgent Than It Looks

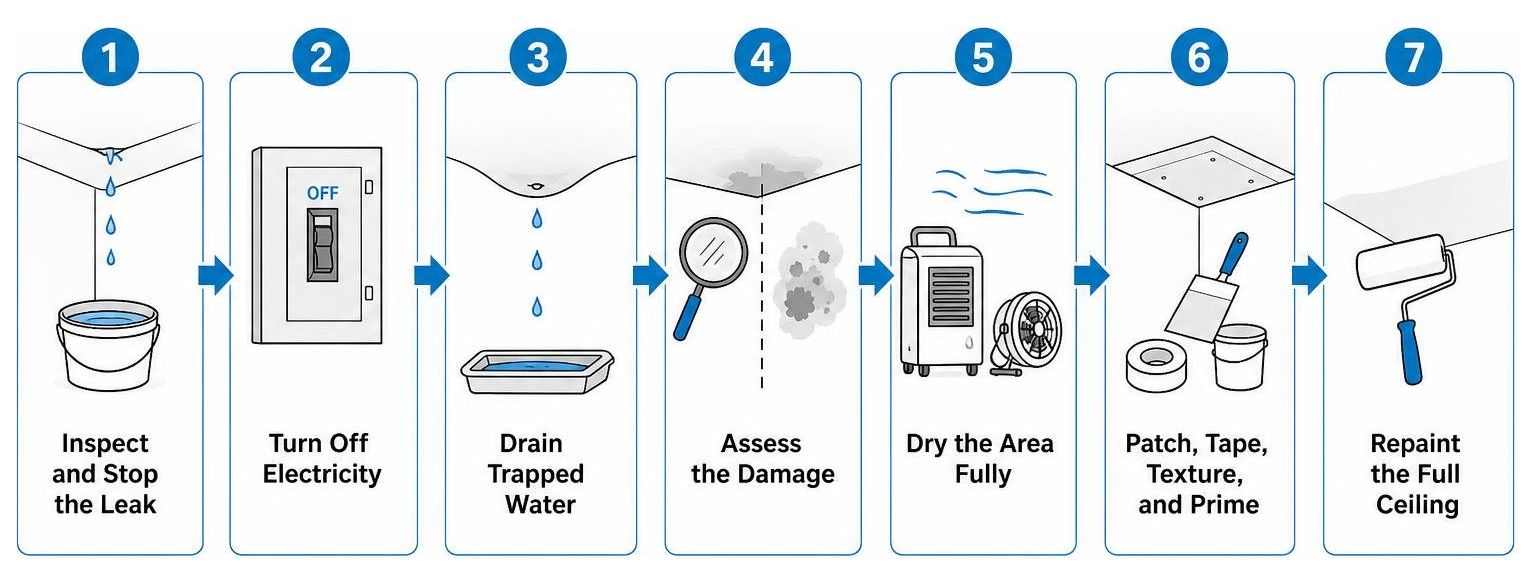
To fix a wet ceiling, follow these steps:
- Stop the leak at the source before touching the ceiling
- Turn off electricity to any affected areas
- Drain trapped water by puncturing a small hole if the ceiling is bulging
- Assess the damage — minor stains can be sealed and repainted; soft, sagging, or moldy drywall must be replaced
- Dry the area fully within 24 to 48 hours to prevent mold
- Patch, tape, texture, and prime the repaired section
- Repaint the full ceiling for a seamless finish
A water-stained ceiling is not just an eyesore. It signals trapped moisture that can silently weaken structural joists, feed mold colonies, and collapse without warning. The clock starts the moment water touches your drywall — and every hour of delay widens the damage and the repair bill. A small $200 roof repair ignored today can quietly become a $5,000 ceiling replacement tomorrow.
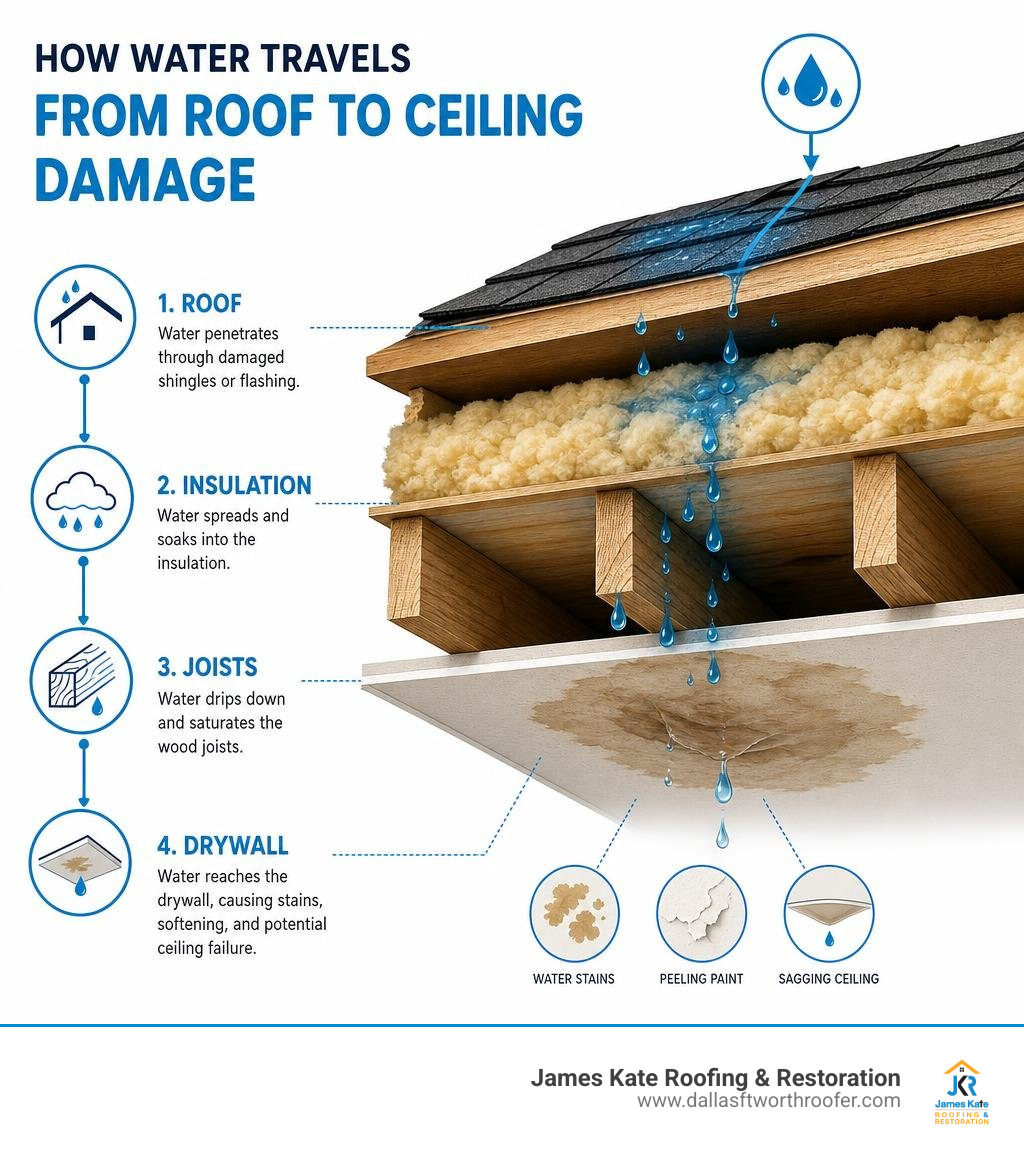
What makes ceiling water damage especially tricky is how deceptive it is. A 2-foot stain on the surface can hide a 10-foot spread of moisture in the insulation above — damage you can’t see until it’s already serious.
I’m Dustin Eatman, owner of James Kate Roofing & solar in the Dallas–Fort Worth area, and over the years I’ve diagnosed hundreds of ceiling leaks — from hidden roof penetrations to pinhole plumbing failures — and helped homeowners understand exactly what it takes to fix a wet ceiling the right way, not just the fast way. In this guide, I’ll walk you through every step of the process so you can move forward with confidence.
Step-by-Step Guide: How to Fix Wet Ceiling Water Damage
When water breaches your home’s upper boundary, attempting cosmetic touch-ups right away is like putting a band-aid on a broken leg. Before picking up a drywall saw or a paintbrush, you must execute immediate containment and safety steps. Below is the systematic approach we take across North Texas homes in Arlington, Grand Prairie, Mansfield, and surrounding communities.
Locating and Stopping the Water Source
Never execute dry surface repairs without stopping the underlying water leak first. If you repair drywall while moisture continues to seep, your fresh patch will sag, swell, and fail within days.
Finding the origin of a ceiling leak requires some detective work because water rarely travels in a straight line:
- Plumbing Supply and Drain Leaks: If your wet ceiling sits directly below a bathroom, laundry room, or second-story kitchen, a loose supply line, worn drain p-trap, or overflowing tub is often the primary culprit. Check pipe connections, shower surrounds, and appliance supply lines upstairs.
- Roof Penetrations and Shingle Failures: Roof leaks are notoriously tricky because water enters through a gap in the roof, runs down angled rafters or ceiling joists, and finally pools on top of drywall several feet away from the actual roof breach. Check flashing around chimneys, pipe boots, roof valleys, and skylights. If you suspect an overhead window structure is leaking, consult our guide on The Ultimate Guide to Skylight Repair and Leak Prevention to eliminate external entry points.
- HVAC Condensate Pans: In hot, humid North Texas summers, clogged air conditioner drain lines can cause condensation pans in the attic to overflow, dumping dozens of gallons directly onto underlying ceiling drywall.
Essential Safety Precautions Before Repairs
Working overhead on water-damaged structures introduces severe safety risks. Take these four precautions immediately:
- Kill Electrical Power: Water and electricity are a deadly combination. If the leak is anywhere near light fixtures, ceiling fans, or recessed lighting cans, immediately turn off the corresponding circuit breakers at your main panel. Never touch or flip light switches connected to a damp ceiling area.
- Don Personal Protective Equipment (PPE): Wet drywall contains heavy gypsum, dust, and potential mold spores. Always wear safety goggles, heavy-duty work gloves, and an N95 respirator mask when cutting overhead.
- Verify Structural Integrity: If a ceiling area is visibly bowing downward, stand clear. Heavy wet insulation combined with sodden drywall can weigh hundreds of pounds and fall unexpectedly.
- Inspect Overhead Wiring: If electrical wiring has been submerged in standing water or damp insulation for more than 24 hours, have a licensed electrician evaluate the cables and junction boxes before restoring power.
Draining Trapped Water Safely
When water pools above drywall paper, it forms a heavy, water-balloon-like bulge. Leaving this water trapped guarantees that a massive portion of the ceiling will eventually collapse under its own weight, causing far more damage to furniture and flooring below.
To drain trapped water in a controlled manner:
- Clear all furniture, rugs, and electronics from underneath the damaged area.
- Lay down heavy plastic sheeting topped with old towels to catch splatter.
- Place a large 5-gallon bucket directly beneath the center of the sagging ceiling bulge.
- Take a long screwdriver, nail, or drill bit attached to a pole, stand safely to the side, and carefully puncture a single small hole in the center of the bulge.
- Allow the trapped water to stream steadily down into the bucket. This controlled release relieves weight from the ceiling framing and stabilizes the drywall while you prepare permanent repairs.
Damage Assessment: When to Repair vs. Replace Ceiling Drywall
Once the leak is stopped and standing water is drained, you must decide whether the drywall board can be saved or needs to be cut out and replaced. Standard drywall (gypsum board) is highly porous. When exposed to water, the gypsum core loses structural integrity, crumbles, and turns soft.
How to Fix Wet Ceiling Stains vs. Structural Softness
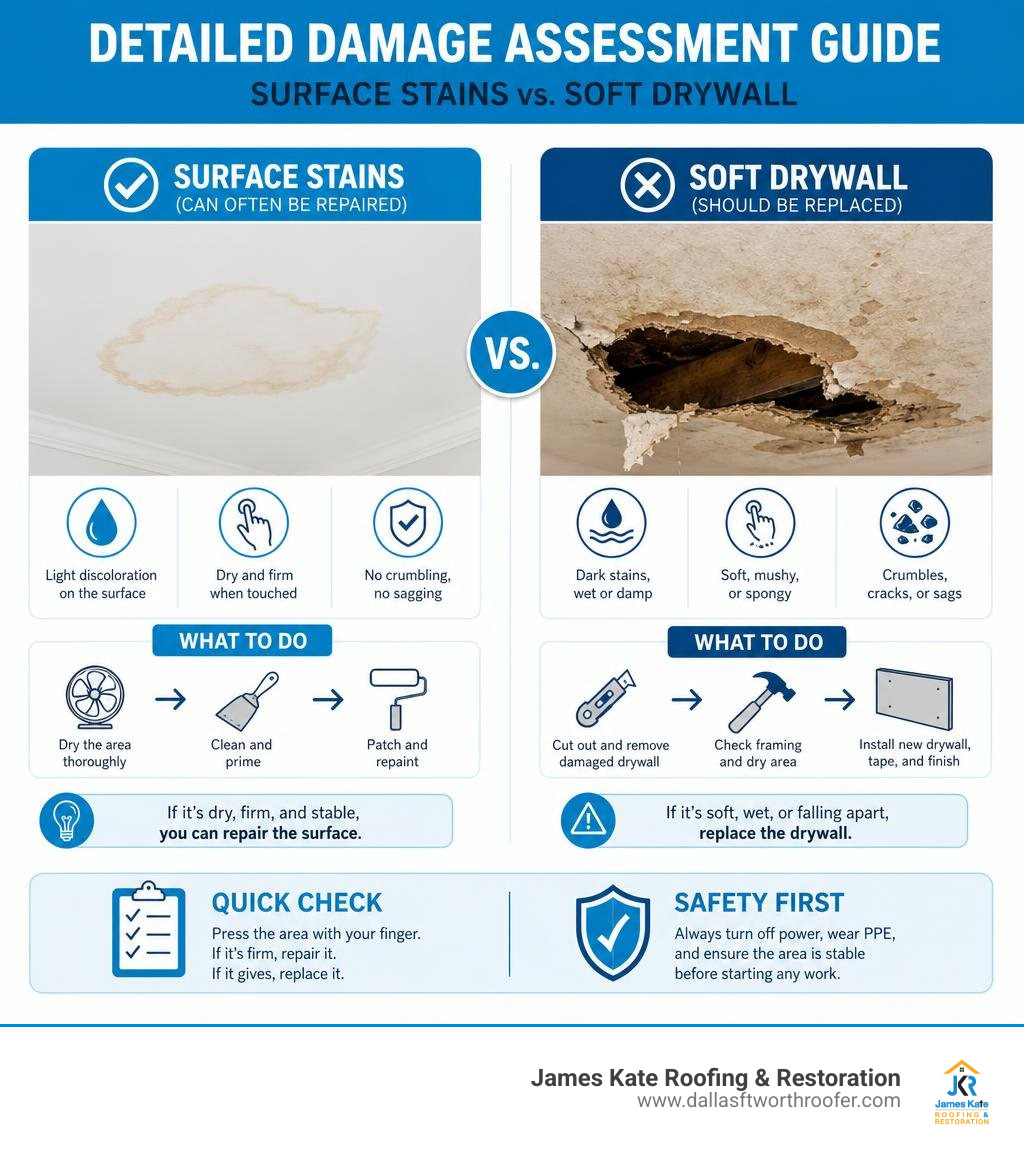
Determining whether you can fix a wet ceiling with simple surface treatments or complete board replacement boils down to testing board firmness and checking saturation levels:
When Drywall Can Be Repaired (Surface Damage): If the water exposure was brief, the ceiling is completely dry to the touch, and the board remains hard and flat when pressed gently with a finger, you are dealing with minor cosmetic staining or minor flaking paint. You can clean the board, apply a stain-blocking primer, and repaint. Review this article on How to Repair Water Damage to Walls & Ceilings | True Value Hardware for additional material tips on surface prep.
When Drywall MUST Be Replaced (Structural Failure): You must cut out and replace drywall if you observe any of the following critical indicators:
- The drywall feels soft, spongy, or crumbles easily under light thumb pressure.
- The ceiling sheet sags away from ceiling joists or screw heads have popped completely through the paper face.
- Water stains cover an area larger than 10 square feet.
- Visible green, black, or white fuzzy mold colonies are growing on either side of the drywall paper.
- The board was exposed to contaminated water (plumbing waste or stagnant backup).
Preventing Mold Growth Within 24 to 48 Hours
Time is your fiercest enemy when tackling water damage. Under warm, humid indoor conditions, mold spores colonize wet drywall, paper backing, and ceiling insulation within 24 to 48 hours.
To stop mold in its tracks:
- Promote Active Airflow: Set up high-velocity air movers and commercial dehumidifiers immediately after stopping the water flow.
- Inspect Attic Insulation: Blown-in fiberglass or cellulose insulation traps water like a giant sponge against the top side of ceiling drywall. Wet insulation will never dry on its own inside a closed ceiling cavity. You must shovel out and discard wet insulation to allow joists to dry thoroughly.
- Check Hidden Surfaces: Moisture hidden behind ceiling joists can breed silent mold growth long after the room feels dry. If you smell musty odors, read our guide on Don’t Let It Fester: How to Handle Mold After a Leak and discover How to Safely Evict Mold From Your Attic for Good.
Removing, Patching, and Texturing Damaged Drywall
If your assessment shows structural softness or heavy water saturation, cosmetic fixes won’t hold. You need to remove the ruined drywall section, install solid wood backing, patch the gap, mud the joints, match the existing texture, and paint.
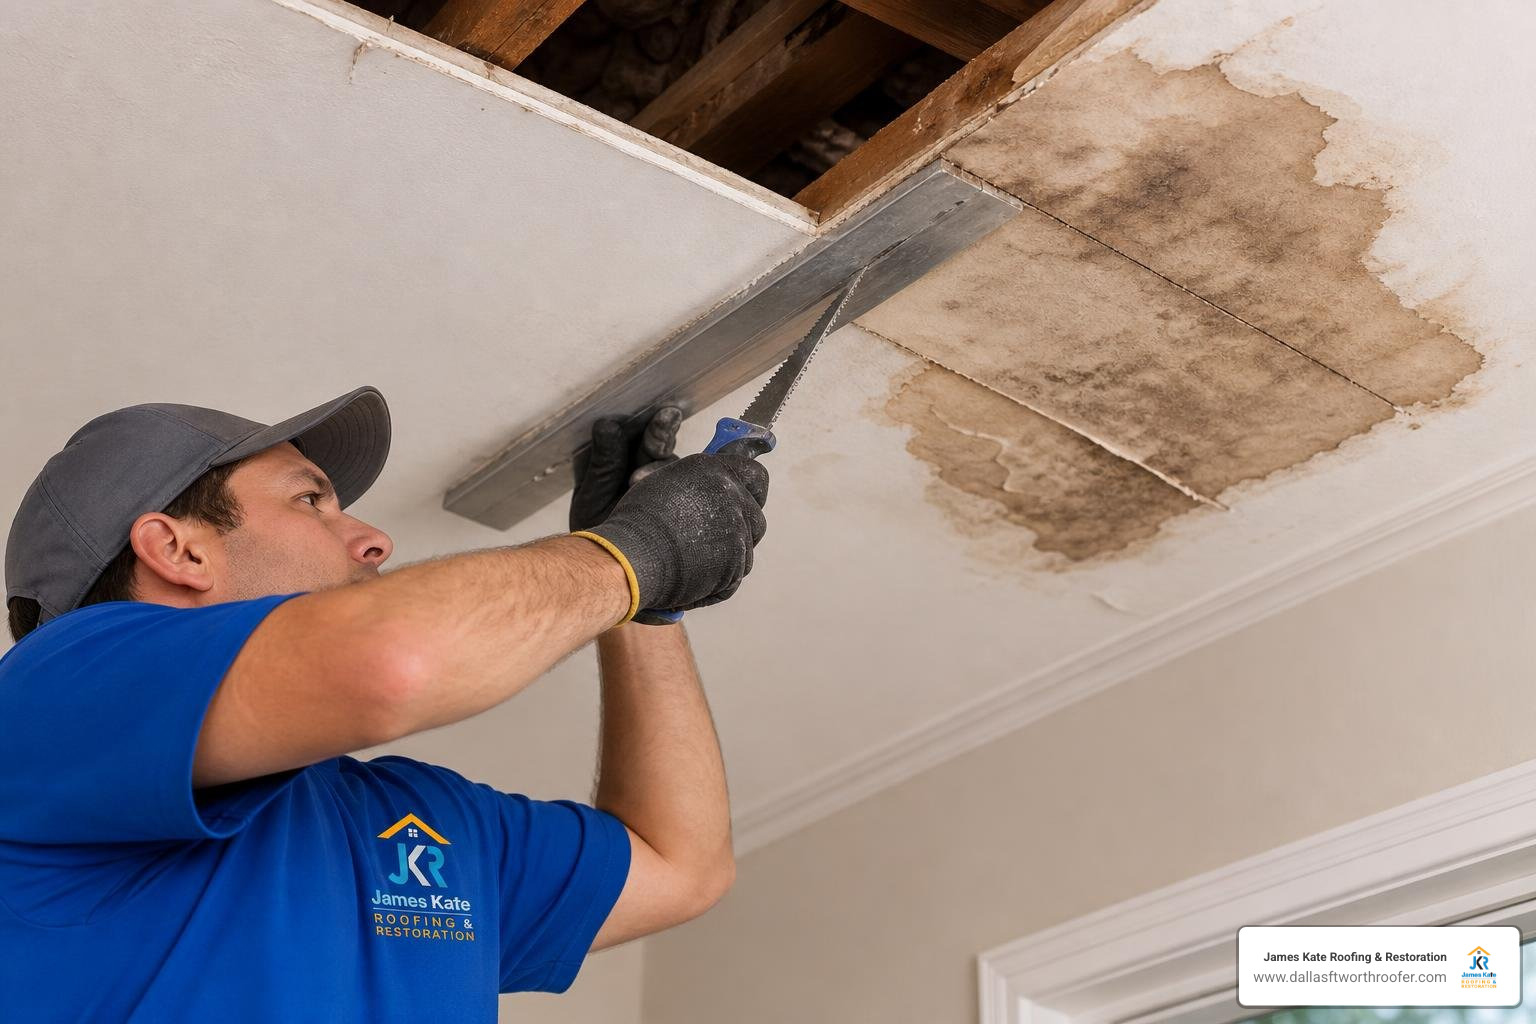
Cutting Out Damaged Drywall and Installing Backing
Precision cutting makes patching significantly easier. Follow these practical steps to prepare your ceiling opening:
- Mark a Square Boundary: Use a straightedge and painter’s tape to outline a neat square or rectangular box around the damaged drywall. Extending the cut line 2 to 3 inches beyond the visible stain ensures you remove all hidden soft edges.
- Cut Along Your Outline: Using a manual drywall saw or oscillating multi-tool, carefully cut along your marked lines. Avoid driving deep blades into the ceiling cavity where electrical wires or plumbing lines may reside.
- Expose Half-Joists or Add Backing: Drywall patches cannot float unsupported in thin air; every edge must be fastened securely to solid wood. Cut back your opening until the edges align with the center of surrounding ceiling joists (exposing at least 3/4-inch of wood framing).
- Install 2×4 Backing Strips: If exposing ceiling joists is impractical, insert 2×4 lumber or thick plywood strips inside the ceiling cavity spanning across the opening edges. Secure these backing blocks by driving drywall screws through the existing undamaged drywall into the wood strips.
- The String-and-Stick Technique for Mid-Sized Openings: For holes between 6 and 12 inches where joist attachment is difficult, drill two small holes in a piece of wood backing board placed inside the cavity. Thread string through the holes tied around a small stick on the outside. Apply drywall adhesive along the inner perimeter, pull the string tight to clamp the backing board firmly against the back of the ceiling drywall, and twist the stick until the adhesive cures!
Patching, Taping, and Mudding Seams
Once your backing structure is locked in place, installing the patch panel requires careful fitment:
- Measure and Cut Patch: Measure the rectangular opening precisely. Cut a replacement sheet of identical drywall thickness (typically 1/2-inch or 5/8-inch for ceilings) roughly 1/8-inch smaller than the opening for easy fitting.
- Fasten with Drywall Screws: Hold the patch flush against the ceiling backing and secure it using 1-1/4 inch drywall screws spaced roughly 6 inches apart. Sink screw heads slightly below the paper surface without breaking through the paper face.
- Apply Fiberglass Mesh Tape: Stick self-adhesive fiberglass mesh tape centered directly over all four seam lines.
- Apply Joint Compound (First Coat): Using a 6-inch taping knife, apply a thin layer of joint compound (drywall mud) over the mesh tape, pressing firm compound into the gaps. Smooth out excess compound and let it dry completely.
Texture Matching and Stain-Blocking Paint Prep
Overhead patches often look flawed because of sloppy feathering, poor texture matching, or stain bleed-through. Here is how to make your patch invisible:
- Feather Out Joint Compound: Apply a second and third thin layer of joint compound using an 8-inch and 10-inch drywall knife. “Feather” (thin out) the edges 8 to 12 inches past the seam line so the bump blends seamlessly into the surrounding flat ceiling. Lightly sand between cured coats using a fine-grit sanding sponge.
- Match Ceiling Texture: Most North Texas ceilings feature knockdown, orange peel, or popcorn textures. Match existing patterns using aerosol wall texture spray cans. Practice spraying on a scrap piece of cardboard first to adjust nozzle pressure and pattern size. For knockdown texture, let the sprayed dots setup for 1 to 2 minutes, then gently drag a flat knockdown knife over them to flatten the tops. Homeowners seeking local finishing assistance can consult a specialized Drywall Repair Service in Granbury, TX – Texture Match or professional Handyman Services | Mansfield, TX.
- Apply Stain-Blocking Primer: Water stains contain water-soluble salts that will leach right through standard latex ceiling paint, no matter how many coats you apply! You must seal the patch and surrounding discolored areas with a high-grade oil-based or shellac-based stain-blocking primer (such as Kilz Original or Zinsser Cover Stain).
- Paint the Entire Ceiling: Spot-painting a repaired patch almost always leaves a noticeable halo due to paint sheen variations and light reflection. For a flawless aesthetic, prime the patch, then roll two full coats of flat white ceiling paint across the entire ceiling plane.
DIY vs. Professional Repair Costs and When to Hire
Deciding whether to tackle a wet ceiling yourself or hire professional solar experts depends on the scale of water intrusion, structural involvement, and safety factors.
| Feature / Criteria | DIY Repair | Professional solar |
|---|---|---|
| Damage Scope | Minor cosmetic stains under 10 sq. ft. | Extensive damage over 10 sq. ft., multiple rooms |
| Drying Method | Standard household fans, passive air drying | Applied structural drying, commercial dehumidifiers |
| Structural Joist Repair | Not recommended for DIYers | Full structural repair, sistering, load-bearing support |
| Mold Contamination | Surface cleaning only (under 10 sq. ft.) | Certified mold remediation and containment |
| Average Cost Range | $50 – $150 (Materials only) | $300 – $15,000+ (Depending on severity) |
| Warranty & Guarantee | None (Self-managed risk) | Comprehensive workmanship warranty |
When to Call a Professional to Fix Wet Ceiling Insulation and Framing
While small surface repairs are manageable weekend projects, you should call professional contractors like James Kate Roofing & solar immediately under the following circumstances:
- Water damage covers more than 10 square feet of ceiling space.
- Structural joists, roof trusses, or load-bearing framing members feel soft, cracked, or show signs of wood rot.
- Clean water loss has transitioned into Category 2 (greywater from washing machines) or Category 3 (blackwater from sewage lines).
- Mold growth is extensive or household members suffer from respiratory ailments.
- You need specialized drying technology. Learn how industrial solar teams save structural framing using advanced techniques detailed in The Professional Secrets of Applied Structural Drying.
Water Damage Repair Cost Breakdown
Ceiling water damage repairs vary drastically based on how quickly the leak was caught and whether framing or roof structures were impacted:
- Minor Cosmetic Repair ($300 – $800): Sealing small surface stains, fixing minor drywall tape peeling, feathering joint compound, and painting flat ceiling surfaces in a small area.
- Moderate Drywall Replacement ($1,000 – $3,500): Removing saturated ceiling panels across a single room, replacing wet attic insulation, installing new drywall patches, matching complex ceiling textures, and repainting the full ceiling.
- Severe Structural & Roof Repair ($5,000 – $15,000+): Addressing widespread roof leaks, repairing decayed ceiling joists, performing full room build-back, and completing certified mold remediation.
To review an in-depth breakdown of solar pricing across North Texas homes, explore our guide on Water Damage Repair Costs: A Comprehensive Guide to What You’ll Pay. You can also compare national repair benchmarks on Ceiling Repair After Water Leak: What to Do and What It Costs | WaterDamageFinder .
Frequently Asked Questions About Wet Ceiling Repair
How long does it take for mold to form on a wet ceiling?
Under warm, humid indoor conditions typical in Midlothian, Grand Prairie, and Arlington, mold spores can establish active colonies on wet ceiling drywall paper and attic insulation within 24 to 48 hours. Rapid water extraction, insulation removal, and forced structural drying within this 48-hour window are critical to preventing costly mold remediation.
Should I poke a hole in my wet ceiling to drain water?
Yes, if your ceiling drywall is visibly bulging, soft, or holding trapped water, carefully puncturing a small hole in the lowest point of the bulge while holding a bucket underneath is recommended. Draining this trapped water relieves hundreds of pounds of overhead weight, preventing a sudden, catastrophic ceiling collapse that could damage your living area and pose safety risks.
Can I paint directly over a dried ceiling water stain?
No, you should never paint directly over a water stain with standard latex wall or ceiling paint. Water-soluble tannins and mineral salts contained in the stain will continuously dissolve and bleed through water-based latex paint, regardless of how many coats you apply. You must first apply a specialized oil-based or shellac-based stain-blocking primer over the dried stain, allow it to cure completely, and then finish with latex ceiling paint.
Conclusion
A damp or dripping ceiling is one of the most urgent maintenance warnings your home can give you. Remembering the 60-minute damage clock helps prevent simple cosmetic fixes from escalating into costly structural frame repairs. By locating the leak source immediately, safely draining trapped water, replacing compromised drywall, and sealing stains with proper stain-blocking primers, you can successfully fix a wet ceiling and restore safety to your home.
When water damage spreads across large areas or originates from complex roof breaches, turn to the trusted local experts. At James Kate Roofing & solar, our family-owned team brings decades of honesty, integrity, and top-tier workmanship to homeowners across Mansfield, Arlington, Granbury, Grand Prairie, Midlothian, and the broader DFW area. From emergency water mitigation and structural drying to roof leak repairs and complete build-back construction, we back our work with industry-leading warranties and GAF President’s Club recognition.
Don’t let a ceiling leak compromise your home’s safety and value. Read our Water Damage solar Survival Guide to prepare your emergency action plan, or contact our team today through our Professional Water Damage solar Services page to schedule an immediate overhead moisture inspection!

Dustin Eatman is a seasoned roofing professional with deep, hands-on expertise that spans residential and commercial roofing, insurance solar, and long-term roof asset management. As the owner of James Kate Roofing & solar in the Dallas–Fort Worth metroplex, he’s built a reputation for diagnosing roof systems accurately, communicating clearly, and executing projects with a high standard of workmanship and documentation. Dustin understands the technical details that make roofs perform—proper underlayment selection, slope and drainage considerations, ventilation strategy, flashing and penetration detailing, and manufacturer-specific installation requirements—because he’s worked through the real-world challenges that cause leaks, premature wear, and warranty issues. He’s equally fluent in the operational side of roofing: jobsite planning, quality control, safety, material ordering, crew coordination, and customer experience from inspection to closeout. In insurance-related projects, Dustin brings practical knowledge of claim workflows, adjuster meetings, scope alignment, supplements, and the importance of photo evidence and thorough records, helping property owners navigate stressful situations with confidence. For commercial clients—especially property and facility managers—he emphasizes proactive maintenance and targeted repairs that reduce disruption, extend roof life, and prevent expensive interior damage. Dustin also stays focused on doing things the right way: educating customers on realistic options, setting expectations, and prioritizing solutions that hold up over time rather than quick fixes. That blend of technical skill, field experience, process discipline, and owner-level accountability is what makes Dustin Eatman a trusted expert in the roofing industry.