
Understanding the Math: How Is a Roof Measured in Squares and Pitch?
Accurate roof measuring requires understanding how two-dimensional footprints translate into three-dimensional sloped surfaces. When estimating materials, calculating horizontal square footage alone will lead to significant shortages.
A roof consists of inclined planes. The steepness of these planes determines how much larger the actual surface area is compared to the flat ground footprint beneath it. By calculating the true rafter length and multiplying horizontal dimensions by the appropriate slope correction factor, we determine the exact square footage required for complete coverage.
| Roof Pitch | Rise over Run | Slope Correction Multiplier | Surface Increase Over Flat Footprint |
|---|---|---|---|
| 3:12 | 3″ rise per 12″ run | 1.031 | +3.1% |
| 4:12 | 4″ rise per 12″ run | 1.054 | +5.4% |
| 5:12 | 5″ rise per 12″ run | 1.083 | +8.3% |
| 6:12 | 6″ rise per 12″ run | 1.118 | +11.8% |
| 7:12 | 7″ rise per 12″ run | 1.158 | +15.8% |
| 8:12 | 8″ rise per 12″ run | 1.202 | +20.2% |
| 9:12 | 9″ rise per 12″ run | 1.250 | +25.0% |
| 10:12 | 10″ rise per 12″ run | 1.302 | +30.2% |
| 11:12 | 11″ rise per 12″ run | 1.357 | +35.7% |
| 12:12 | 12″ rise per 12″ run | 1.414 | +41.4% |
Converting Surface Area into Standard Roofing Squares
In the roofing trade, material orders and labor estimates are standardized using the term “square.” One roofing square equals exactly 100 square feet of finished roof surface.
Manufacturers package asphalt shingles, roll underlayment, and synthetic felt around this unit of measurement. For example, standard architectural laminated shingles are packaged in bundles where three bundles provide 100 square feet of coverage.
To convert total sloped square footage into squares, divide the total calculated square footage by 100:
$$\text{Roofing Squares} = \frac{\text{Total Sloped Surface Area in Sq Ft}}{100}$$
If a home has a calculated roof surface area of 2,450 square feet, the roof measures 24.5 squares. For detailed steps on manufacturer standards, review the guide on how to measure a roofing square. Understanding this conversion helps homeowners build realistic budgets and evaluate quotes using our A-Z guide to roof replacement cost estimation.
Determining Pitch and Applying the Slope Factor
Roof pitch represents the vertical rise over a 12-inch horizontal run. A “6:12” pitch means the roof rises 6 vertical inches for every 12 horizontal inches of depth.
Pitch can be measured without getting on the roof by taking a reading inside the attic against an exposed rafter using a 12-inch level and a tape measure, or with a digital smartphone inclinometer app placed directly against the underside of the roof deck.
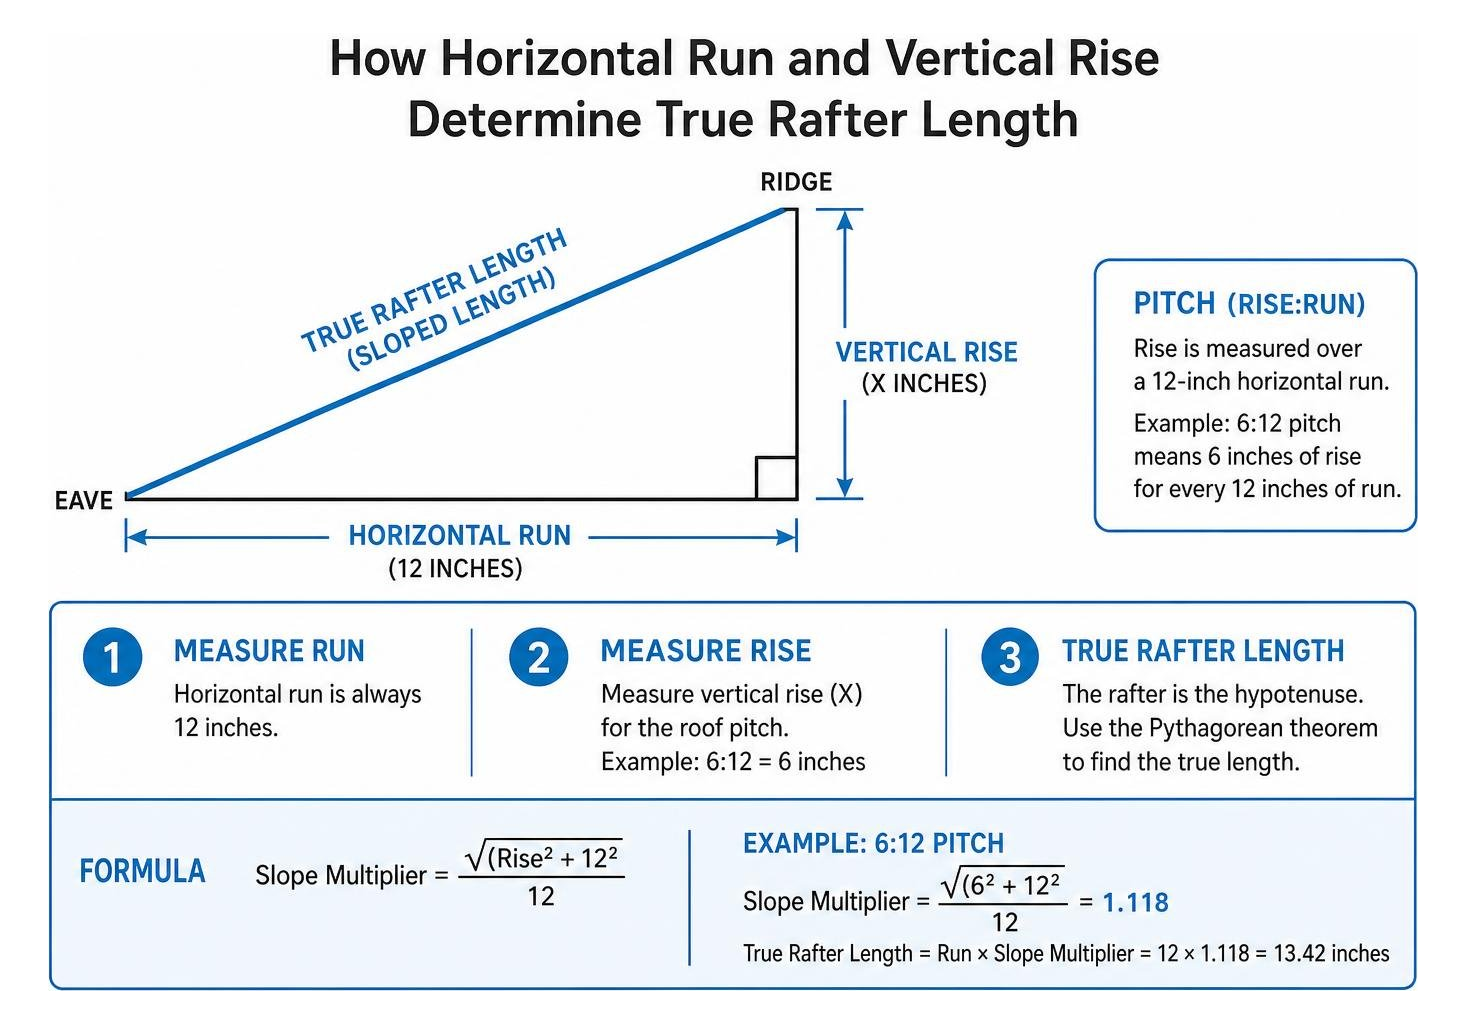
The slope factor is derived mathematically from the Pythagorean theorem:
$$\text{Slope Multiplier} = \frac{\sqrt{\text{Rise}^2 + 12^2}}{12}$$
For a 6:12 pitch:
$$\sqrt{6^2 + 12^2} = \sqrt{36 + 144} = \sqrt{180} \approx 13.416$$ $$\text{Multiplier} = \frac{13.416}{12} \approx 1.118$$
Applying this multiplier expands the flat horizontal footprint into the true sloped area. A home measuring a 2,000 sq ft flat footprint with a 6:12 pitch has a sloped surface area of 2,236 square feet ($2{,}000 \times 1.118$). A steep 12:12 pitch expands that same footprint by 41.4%, requiring 2,828 square feet of material before factoring in waste.
Practical Measurement Methods: Ground, Surface, and Aerial Takeoffs
Accurately determining dimensions depends on safety, roof pitch, structural complexity, and available tools. There are three primary methods used by contractors and DIYers.
Step-by-Step Guide: How Is a Roof Measured from the Ground?
Ground-level measurement allows you to calculate total square footage safely without walking on steep decking.
- Measure the Exterior Perimeter: Walk the base of the home with a long measuring tape or laser measure. Record the length and width of each exterior wall segment.
- Account for Overhangs: Add the horizontal distance the eaves and rake edges extend past the exterior walls (typically 12 to 24 inches on each side). If a house is 40 feet long with a 1-foot overhang on each side, the total roof length is 42 feet.
- Calculate the Flat Footprint Area: Multiply the total adjusted length by the adjusted width to find the horizontal footprint.
- Determine Roof Pitch: Measure the slope from the attic rafters or from a secure ladder at the eave.
- Apply the Slope Multiplier: Multiply the total flat area by the pitch multiplier found in the table above.
Homeowners looking for a complete walkthrough of this process can reference our guide on how to measure your own roof for additional field tips.
Direct Roof-Walking and Manual Surface Measurements
Walking the roof provides direct measurements of every rafter run, facet, and valley line. However, this method requires proper fall-arrest equipment, pitch-appropriate footwear, and dry weather conditions.
To measure directly:
- Hook a heavy-duty tape measure securely over the ridge cap and pull the tape straight down to the drip edge along the rafter line to find the true slope length.
- Measure the horizontal length along the eave from corner to corner.
- Repeat this for each separate plane on the structure.
For complex architectural styles, manual methods demand meticulous field notes to avoid missing hidden facets or overhangs. You can explore contractor techniques in this roof takeoffs manual measurement guide.
Professional High-Resolution Aerial and Drone Reports
Professional roofing contractors use high-resolution aerial measurement reports and drone photogrammetry to obtain sub-inch dimensional data.
Aerial reports utilize high-resolution imagery—up to 140 times clearer than standard satellite views—to generate full 3D wireframe models of the structure. These reports include:
- Total surface area broken down by individual plane
- Specific pitch calculations for every facet
- Linear footage calculations for ridges, hips, valleys, rakes, and eaves
- Automated penetration mapping for plumbing boots, vents, and chimneys
These reports cost between $20 and $100 per structure and provide 98%+ accuracy while eliminating fall hazards. For comprehensive structural overhauls, knowing how to choose a roofing contractor who uses verified digital takeoff tools ensures transparent material estimates.
Calculating Complex Roof Geometry and Factoring Waste
Standard gable roofs consist of two simple rectangular planes. However, contemporary residential homes often incorporate complex architectural designs featuring hip ends, intersecting gables, valleys, and dormers.
When evaluating a complex roof, segment the geometry into standard shapes:
- Rectangles (Gable Roofs): $\text{Length} \times \text{Width}$
- Triangles (Hip Ends, Dormer Gables): $\frac{1}{2} \times \text{Base} \times \text{Height}$
- Trapezoids (Main Hip Faces): $\frac{\text{Top Length} + \text{Bottom Length}}{2} \times \text{Sloped Height}$
Calculating the total surface area serves as the basis for inspecting and estimating structural components, such as when following a step-by-step guide to replacing damaged roof decking.
Facet Breakdown for Hips, Valleys, and Dormers
A hip roof slopes downward on all four sides, creating triangular facets at the ends and trapezoidal planes on the front and rear elevations. Valleys occur where two sloping planes meet at an internal angle, channeling rainwater into drainage pathways.
Each intersection requires specific cuts during installation. When shingles or underlayment run into a hip or valley, they must be trimmed along the angle. The remaining diagonal scrap cannot typically be flipped and reused on the opposite side, resulting in material loss that must be accounted for during the initial measurement.
Determining the Accurate Waste Factor Percentage
The waste factor is the additional percentage of material added to the net square footage to compensate for angular cuts, starter shingles, ridge capping scrap, and packaging loss.
- Simple Gable Roofs (2 to 4 facets): 10% waste
- Standard Hip and Valley Roofs: 12.5% to 15% waste
- Cut-Up Architectural Roofs (multiple dormers, varying pitches, turrets): 15% to 20%+ waste
If a cut-up hip roof has a measured surface area of 26.2 squares (2,620 sq ft), applying a 15% waste factor requires ordering:
$$26.2 \times 1.15 = 30.13 \text{ squares (rounded up to 31 squares)}$$
Ordering based solely on net measurements will leave a project short on materials, causing mid-job delays.
Linear Measurements and Material Takeoff Calculations
In addition to calculating total surface area, accurate takeoffs require precise linear footage measurements along the roof’s primary edges and intersections.
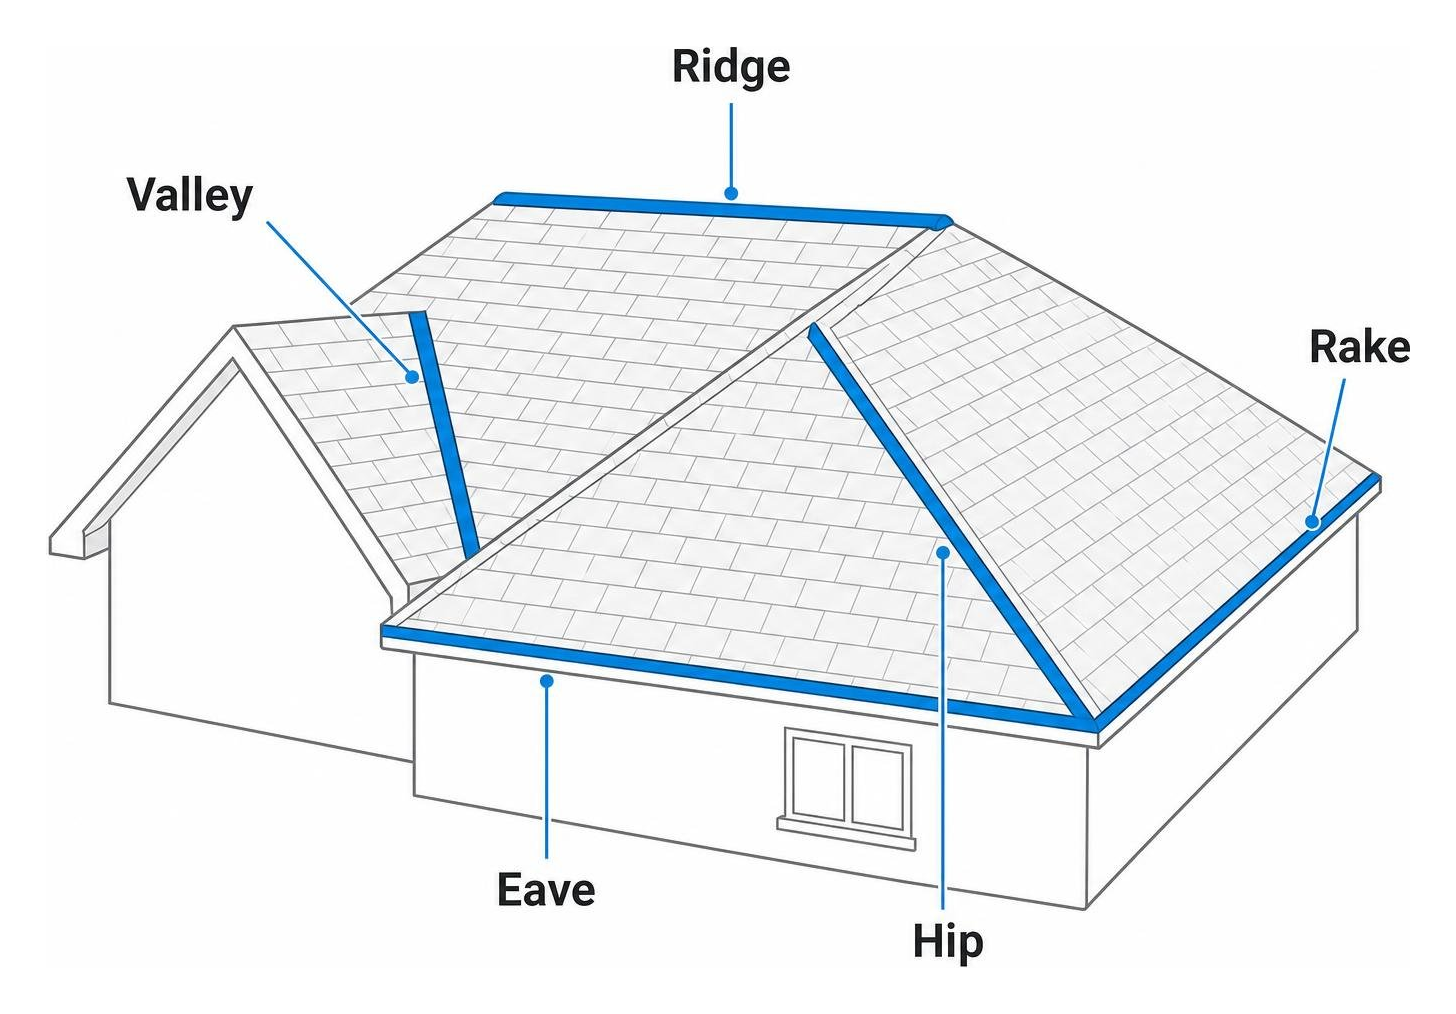
Measuring Key Linear Components: Ridge, Hip, Valley, Eave, and Rake
Different accessories are determined by specific linear measurements:
- Eaves: The horizontal lower edges where gutters attach. Eave footage determines the required drip edge metal and starter shingle strips.
- Rakes: The sloped edges running along a gable profile. Rake footage dictates gable-edge drip edge trim.
- Ridges: The horizontal peaks where two opposing planes meet. Ridge measurements determine ridge cap shingles and ridge ventilation exhaust vents.
- Hips: The inclined external ridges formed by the intersection of two adjoining roof slopes. Hip footage requires hip cap shingles.
- Valleys: The internal intersections where water runoff concentrates. Valley footage determines closed-valley underlayment, ice and water shield rolls, or open metal valley flashing.
Calculating Shingle Bundles, Underlayment, and Fasteners
Once surface area and linear measurements are finalized, convert the data into a complete material order:
- Asphalt Shingles: Standard architectural shingles require 3 bundles per square. Heavyweight designer shingles may require 4 to 5 bundles per square.
- Starter Strip: Purpose-made starter strip packages cover approximately 100 to 105 linear feet per bundle. Total starter need is calculated by summing the total eave footage (and rake footage if required by manufacturer specifications): $$\text{Starter Bundles} = \frac{\text{Total Eave Length} + \text{Total Rake Length}}{100}$$
- Hip and Ridge Cap: Specialized architectural cap shingles cover approximately 25 to 35 linear feet per bundle. $$\text{Cap Bundles} = \frac{\text{Total Ridge Length} + \text{Total Hip Length}}{30}$$
- Synthetic Underlayment: Standard rolls cover 10 squares (1,000 sq ft), while premium rolls cover 4 squares (400 sq ft). Divide total gross squares by roll coverage and round up.
- Fasteners (Coil Roofing Nails): Standard installation uses 4 nails per shingle (~320 nails per square). High-wind installations require 6 nails per shingle (~480 nails per square). A typical 30-square project under high-wind specifications requires approximately 14,400 nails.
For a broader financial breakdown of these components, consult our step-by-step guide to roof installation cost.
Material Variations: How Is a Roof Measured for Metal vs. Asphalt Shingles?
Measuring for metal roofing involves different parameters than measuring for asphalt shingles. Asphalt shingles are modular and easily cut in the field, whereas metal roofing requires pre-ordered or custom roll-formed panel lengths.
When calculating a standing seam or corrugated metal roof:
- True Rafter Length (Panel Length): Panels must run continuously from ridge to eave plus a 1- to 2-inch overhang into the gutter. Measuring horizontal run is insufficient; precise sloped rafter lengths are required.
- Net vs. Gross Panel Coverage: Metal panels are specified by their net coverage width, not their gross coil width. A standing seam panel with a 16-inch net coverage width covers 16 inches of horizontal eave. If an eave is 32 feet wide (384 inches): $$\frac{384 \text{ inches}}{16 \text{ inches/panel}} = 24 \text{ panels}$$ Exposed-fastener corrugated panels typically feature 36-inch net coverage widths after accounting for overlapping ribs.
- Thermal Expansion Allowances: Metal panels expand and contract with temperature swings. A 20-foot steel panel can expand roughly 3/16 inch across seasonal extremes. Measurements must allow for proper expansion clearances at ridge caps and end laps.
Common Measurement Errors and How to Avoid Them
Even small mistakes during the measurement stage can lead to substantial budget overruns or material shortages:
- Ignoring Pitch Multipliers: Measuring only the home’s ground footprint and dividing by 100 omits the slope increase. On an 8:12 pitch, this mistake leaves the project short by over 20% in raw materials.
- Tape Measure Sagging: Pulling a long 100-foot tape measure across a roof surface without support allows the tape to sag, artificially inflating linear measurements. Use a laser measure or keep the tape taut against the decking.
- Forgetting Eave and Rake Overhangs: Exterior walls do not mark the roof’s edge. Omitting the 12- to 24-inch overhang perimeter will undercalculate the roof surface by an entire square or more.
- Underestimating Hip and Valley Cut Waste: Applying a flat 10% waste factor to a roof with numerous dormers and hip intersections will cause material shortages on the final day of installation.
- Overlooking Auxiliary Structures: Attached garages, covered porches, breezeways, and bay windows are easily missed on simple sketches. Measure every covered surface attached to the main structure.
Frequently Asked Questions About Roof Measurements
How many bundles of shingles are needed per roofing square?
For standard architectural laminated shingles, exactly 3 bundles cover one roofing square (100 square feet). Heavyweight designer or impact-resistant shingles are heavier and packaged at 4 or 5 bundles per square. Always check the packaging coverage rating before placing a material order.
Can I measure my roof accurately without getting on the roof?
Yes. You can measure the exterior perimeter walls from the ground, add the overhang dimensions, determine the pitch from inside the attic with a level, and apply the corresponding slope multiplier. Alternatively, ordering a professional high-resolution aerial measurement report provides sub-inch precision without ladder work.
How much extra material should I order for waste?
A standard gable roof requires a 10% waste buffer. Hip roofs with intersecting valleys require 12.5% to 15% waste. Highly complex, cut-up roofs with multiple dormers, turrets, or varying pitches require 15% to 20% waste to account for angled cuts and starter courses.
Conclusion
Precise roof measurements are the foundation of every successful roofing project. By understanding how sloped surface area relates to horizontal footprints, using pitch multipliers, and accurately estimating linear trim items, you protect your budget and ensure you have sufficient materials on-site.
At James Kate Roofing & solar, we operate across Mansfield, Arlington, Granbury, Grand Prairie, and Midlothian, TX, bringing honesty, integrity, and Biblical principles to every project. Backed by GAF President’s Club recognition and offering up to 25-year workmanship warranties, our team ensures every measurement, material takeoff, and installation meets the highest industry standards.
If you are planning an upcoming project, learn how to measure a roof yourself to get an accurate quote or reach out to our team today for a professional evaluation.

Dustin Eatman is a seasoned roofing professional with deep, hands-on expertise that spans residential and commercial roofing, insurance solar, and long-term roof asset management. As the owner of James Kate Roofing & solar in the Dallas–Fort Worth metroplex, he’s built a reputation for diagnosing roof systems accurately, communicating clearly, and executing projects with a high standard of workmanship and documentation. Dustin understands the technical details that make roofs perform—proper underlayment selection, slope and drainage considerations, ventilation strategy, flashing and penetration detailing, and manufacturer-specific installation requirements—because he’s worked through the real-world challenges that cause leaks, premature wear, and warranty issues. He’s equally fluent in the operational side of roofing: jobsite planning, quality control, safety, material ordering, crew coordination, and customer experience from inspection to closeout. In insurance-related projects, Dustin brings practical knowledge of claim workflows, adjuster meetings, scope alignment, supplements, and the importance of photo evidence and thorough records, helping property owners navigate stressful situations with confidence. For commercial clients—especially property and facility managers—he emphasizes proactive maintenance and targeted repairs that reduce disruption, extend roof life, and prevent expensive interior damage. Dustin also stays focused on doing things the right way: educating customers on realistic options, setting expectations, and prioritizing solutions that hold up over time rather than quick fixes. That blend of technical skill, field experience, process discipline, and owner-level accountability is what makes Dustin Eatman a trusted expert in the roofing industry.