

Understanding Roofing Squares and Pitch Multipliers
To measure a roof accurately, start by measuring the home’s exterior footprint, including eave and rake overhangs. Then determine the roof pitch, multiply the horizontal area by the pitch multiplier for that slope, and add a waste allowance of 10% to 20% depending on roof complexity. This gives you the true sloped surface area needed for material ordering and contractor quote verification.
When you estimate a roof replacement, standard square footage is only half the equation. The roofing industry calculates materials, labor, and tear-off using a unit called a “roofing square.” One roofing square equals exactly 100 square feet of actual sloped roof surface. For example, if your home has 2,400 square feet of sloped surface area, you have a 24-square roof. Standard architectural shingles typically require three bundles to cover one square, meaning a 24-square project requires at least 72 bundles before accounting for scrap and cuts.
A common pitfall for homeowners is assuming that the interior square footage of the home equals the roof area. A single-story ranch home with 2,000 square feet of living space does not have a 2,000-square-foot roof. The roof has overhangs extending beyond the exterior walls, and it slopes upward at an angle. That slope creates a larger surface area than the flat footprint sitting directly underneath it.
Roof pitch is expressed as the ratio of vertical rise to horizontal run over a 12-inch baseline (written as rise/run, such as 4/12 or 6/12). A 6/12 roof rises 6 inches vertically for every 12 inches it extends horizontally. According to the International Residential Code (IRC), standard asphalt shingles require a minimum slope of 2:12 to shed water effectively. Low-slope surfaces below 2:12 require specialized membrane assemblies because water drains much more slowly.
To convert flat, horizontal footprint measurements into true sloped surface area, we use a mathematical slope correction factor (pitch multiplier). The formula is:
$$\text{Pitch Multiplier} = \sqrt{1 + \left(\frac{\text{Rise}}{\text{Run}}\right)^2}$$
For example, a 6/12 pitch produces a multiplier of $\sqrt{1 + (6/12)^2} = \sqrt{1.25} \approx 1.118$. This means the actual roof surface is 11.8% larger than its flat footprint. When understanding roof pitch, using the correct factor ensures you never end up short on materials.
| Roof Pitch Ratio | Angle (Degrees) | Slope Correction Factor (Multiplier) | Added Surface Area Over Flat Footprint |
|---|---|---|---|
| 2/12 | 9.5° | 1.014 | +1.4% |
| 3/12 | 14.0° | 1.031 | +3.1% |
| 4/12 | 18.4° | 1.054 | +5.4% |
| 5/12 | 22.6° | 1.083 | +8.3% |
| 6/12 | 26.6° | 1.118 | +11.8% |
| 7/12 | 30.3° | 1.158 | +15.8% |
| 8/12 | 33.7° | 1.202 | +20.2% |
| 9/12 | 36.9° | 1.250 | +25.0% |
| 10/12 | 39.8° | 1.302 | +30.2% |
| 11/12 | 42.5° | 1.357 | +35.7% |
| 12/12 | 45.0° | 1.414 | +41.4% |
As the table shows, a 12/12 pitch roof is 41.4% larger than the footprint of the home. Skipping this multiplier on a steep roof leads to severe material shortages.
Step-by-Step: How to Measure a Roof from the Ground
Measuring from the ground is the safest way to establish an accurate baseline for budgeting and verifying contractor quotes. Ground-based measurements usually land within a 5% margin of error on straightforward roof designs.
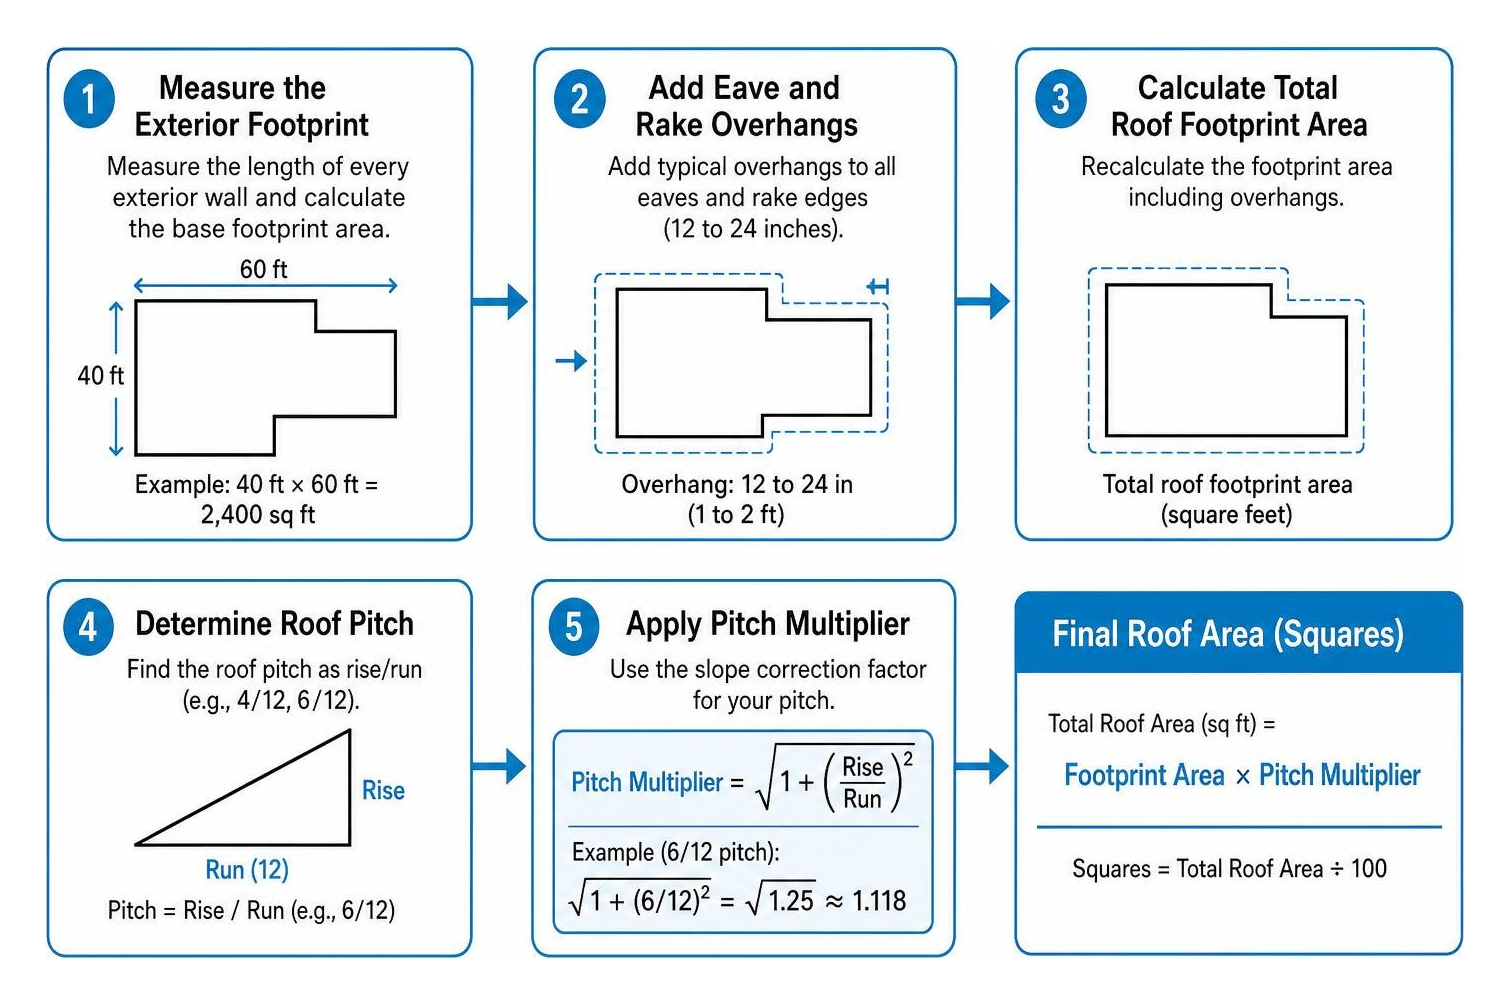
Step 1: Measure the Exterior Footprint
Walk the perimeter of the home with a measuring tape or measuring wheel. Record the length of every exterior wall. If your home is a simple rectangle measuring 40 feet by 60 feet, your base footprint is 2,400 square feet. If your home has bump-outs, attached garages, or covered porches, break the exterior footprint into smaller individual rectangles on graph paper and sum their areas.
Step 2: Add Eave and Rake Overhangs
The roof extends beyond the exterior siding. Most residential eaves and rake edges overhang by 12 to 24 inches (1 to 2 feet).
- Add the overhang on all sides before calculating final footprint dimensions.
- For a 40 ft by 60 ft home with an 18-inch (1.5-foot) overhang on all four sides: $$\text{Adjusted Width} = 40 + 1.5 + 1.5 = 43\text{ ft}$$ $$\text{Adjusted Length} = 60 + 1.5 + 1.5 = 63\text{ ft}$$ $$\text{Projected Footprint} = 43\text{ ft} \times 63\text{ ft} = 2,709\text{ sq ft}$$
Step 3: Determine the Roof Pitch
You can find the pitch without climbing onto the roof:
- Attic rafter method: Place a 12-inch level horizontally against the underside of an exposed roof rafter in the attic. Measure the vertical distance in inches from the 12-inch mark on your level straight up to the rafter.
- Rake board method: Hold a 12-inch level against the exterior rake board along the gable edge from a sturdy step ladder at the eave. Measure the vertical rise to the angled edge.
- Mobile app: Use a smartphone pitch app placed against the soffit or rake board trim.
Step 4: Apply the Pitch Multiplier
Multiply the projected horizontal footprint by the slope factor from our table. For our 2,709 sq ft footprint at a 6/12 pitch (multiplier 1.118): $$\text{Sloped Surface Area} = 2,709 \times 1.118 = 3,028.66\text{ sq ft}$$
This converts to roughly 30.29 roofing squares. Knowing this number gives you an objective foundation for accurate roof replacement cost estimation.
Tools Needed on How to Measure a Roof Safely
You do not need expensive commercial equipment to capture accurate dimensions. Having the right tools on hand prevents compounding measurement errors:
- 100-foot fiberglass or steel tape measure: Avoid relying solely on a 25-foot carpenter tape. Linking multiple short measurements together introduces cumulative measuring errors.
- Laser distance measurer: Excellent for capturing long exterior wall runs or interior attic dimensions quickly without snagging tape on landscaping.
- Smartphone pitch gauge app or angle finder: Calibrated digital tools that read the angle of rafters or fascia boards directly.
- 24-inch or 48-inch carpenter level: Used alongside a standard tape measure to confirm rise-over-run ratios.
- Graph paper, clipboard, and pencil: For sketching roof facets, labeling compass orientations (North, South, East, West), and recording dimensions cleanly.
How to Measure a Roof with Complex Planes and Dormers
Simple gable roofs consist of two flat rectangular planes. Hip, gambrel, mansard, and cut-up architectural roofs feature triangular facets, trapezoids, and vertical changes that require a plane-by-plane approach.

To measure complex roofs:
- Gable Roofs: Two equal rectangular planes meeting at a central ridge. Measure the length of the ridge and the rafter slope length from eave to ridge, multiply them, and double the result.
- Hip Roofs: Four sloped planes meeting at hips and a ridge. Hip roofs feature two triangular ends and two trapezoidal sides. $$\text{Area of a Triangle} = \frac{1}{2} \times \text{Base} \times \text{Height (along the slope)}$$ $$\text{Area of a Trapezoid} = \frac{\text{Base}_1 + \text{Base}_2}{2} \times \text{Height (along the slope)}$$
- Dormers: Each standard gable dormer introduces two small roof planes, two vertical sidewalls, and two valley lines. Measure the dormer planes separately and add them to your total square footage. Do not subtract the main roof area behind small dormers; extra shingle cuts and flashing scrap cancel out any minor unroofed voids.
- Mansard and Gambrel Roofs: These feature broken slopes with two distinct pitches on each side. The lower slope is typically steep (16/12 to 24/12), while the upper slope is much shallower (4/12 to 6/12). Measure each pitch zone independently, apply its individual multiplier, and sum the results.
Calculating Waste Factor and Material Takeoffs
Once you have determined your net roof square footage, you must add a waste factor before ordering materials. Shingles must be trimmed along valleys, hips, rake edges, and flashing transitions. In addition, the installer needs starter courses along all eaves and rakes.
Recommended waste allowances:
- Simple Gable Roof (clean rectangles, minimal penetrations): Add 10%
- Standard Hip Roof (angled cuts along hips and valleys): Add 12% to 15%
- Complex / Cut-Up Roof (multiple dormers, turrets, mixed pitches): Add 15% to 20%
Let’s look at our 2,400 sq ft ranch home example (30.29 net squares at a 6/12 pitch). With a 10% waste factor for a gable design: $$30.29 \text{ net squares} \times 1.10 = 33.32 \text{ gross squares}$$
Always round up to the next full bundle or unit. At 3 bundles per square: $$34 \text{ squares} \times 3 \text{ bundles/square} = 102 \text{ bundles of shingles}$$
A complete material takeoff requires more than just field shingles when preparing for a roof replacement:
- Underlayment: Synthetic underlayment rolls generally cover 10 squares (1,000 sq ft) per roll. For 34 gross squares, order 4 rolls to accommodate overlaps.
- Ice and Water Shield: Required along eaves, valleys, and around chimneys/skylights. Typically supplied in 36-inch wide rolls (spanning 66 linear feet).
- Starter Shingle Strips: Measure the linear footage of all eaves and rake edges. Starter strip bundles usually cover roughly 100 linear feet per bundle.
- Hip and Ridge Cap Shingles: Measure the linear footage of all ridge lines and hips. Ridge cap bundles typically cover 25 to 35 linear feet per bundle.
- Drip Edge: Measure the perimeter of eaves and rakes in linear feet. Standard metal drip edge pieces are 10 feet long; add 10% for lap joints.
- Roofing Nails: Standard installation requires 4 nails per shingle (roughly 320 nails per square). In high-wind areas requiring 6 nails per shingle, plan for 480 nails per square.
- Permits and Local Codes: Ensure your takeoff adheres to local building department requirements, such as the Grand Prairie residential re-roof permit guidelines, which define underlayment and ventilation standards.
Comparing Digital and Satellite Roof Measurement Methods
Advancements in aerial photogrammetry and satellite modeling have transformed how contractors and homeowners measure roofs. Today, high-resolution imagery allows remote measurement with remarkable accuracy.
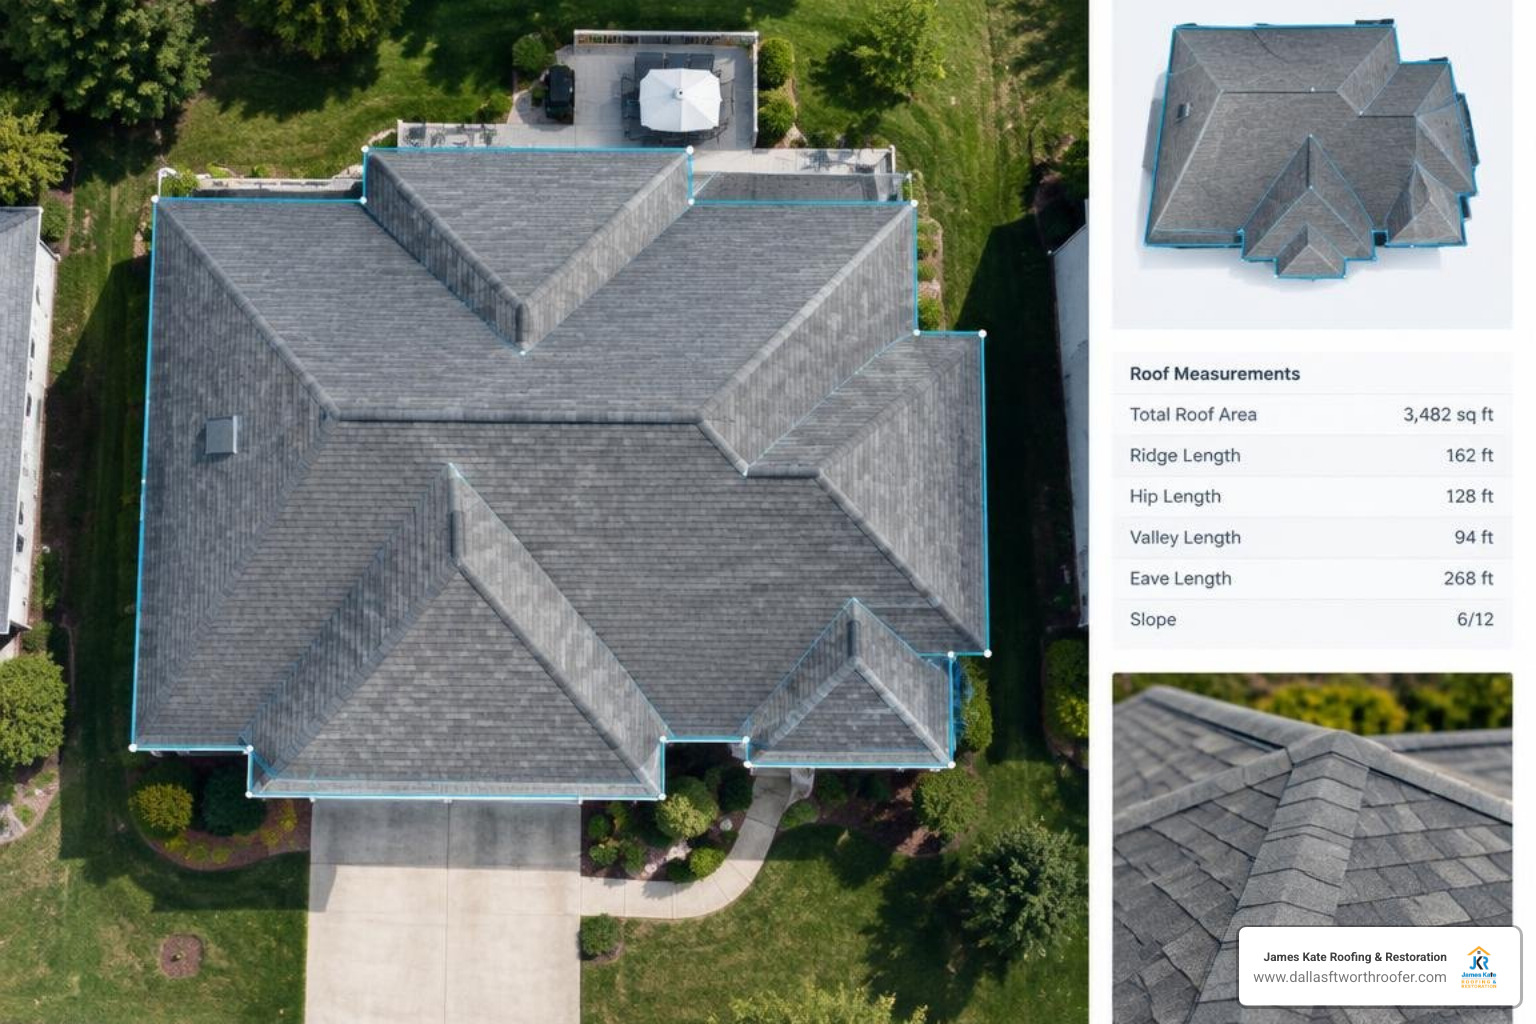
1. Free Satellite Polygon Tracing (Google Earth Pro)
Using the free desktop application Google Earth Pro, you can zoom into your home, orient the camera directly overhead, and use the polygon measurement tool to trace the roof perimeter.
- Accuracy: Within 5% of physical dimensions on unobstructed properties.
- Limitation: Google Earth captures a 2D top-down footprint. You must still determine your pitch and apply the pitch multiplier manually. Tree canopies can also obscure eave lines.
2. Commercial Aerial Measurement Reports (EagleView, GAF QuickMeasure, Hover)
Professional aerial reporting platforms utilize patented oblique aerial photography captured from aircraft and satellites. EagleView’s high-resolution capture delivers 4x the detail of standard aerial imagery and 70x that of basic satellite feeds.
- Accuracy: Typically within 2% to 3% of physical on-roof tape measurements. GAF QuickMeasure single-family reports deliver 3D facet breakdowns, pitch mapping, and linear edge calculations in under an hour with roughly 95% baseline accuracy.
- Cost: Reports range from $18 for basic quick takeoffs to $79–$195 for comprehensive premium commercial engineering packets.
- Application: These reports provide complete length breakdowns for ridges, hips, valleys, rakes, and eaves, which directly align with local cost datasets like Arlington roof replacement data.
3. Direct On-Roof Physical Measurement
Walking the roof deck with a tape measure provides ground-truth confirmation. However, climbing steep slopes involves significant safety risks and should only be performed by insured professionals wearing fall-protection harnesses tied off to structural ridge anchors.
Frequently Asked Questions About Roof Measurements
What is the difference between square footage and a roofing square?
Square footage measures surface area in single units of 1 foot by 1 foot. A roofing square is a specialized construction unit equal to 100 square feet. Roofing materials are packaged and priced by the square rather than by individual square feet. For standard architectural shingles, it takes 3 bundles to cover 1 roofing square.
How much waste factor should be added for shingles?
Waste factor depends on the complexity of your roofline:
- 10% for simple gable roofs with two uninterrupted planes.
- 12% to 15% for hip roofs with intersecting ridges and diagonal hips.
- 15% to 20% for cut-up architectural roofs with multiple valleys, dormers, and varying pitch angles.
- 5% for low-slope flat roofs using single-ply roll membranes like TPO or EPDM.
Can you accurately measure a roof without climbing onto it?
Yes. By measuring the ground-level exterior footprint, adding overhang dimensions, and applying the correct mathematical pitch multiplier, you can estimate your roof within a 5% margin of error. Alternatively, ordering a professional aerial report from services like GAF QuickMeasure or EagleView yields results within 2% to 3% accuracy without ever setting foot on a ladder.
Conclusion
Accurate roof measurements protect your investment. Calculating true sloped surface area, accounting for pitch multipliers, and including the right waste factor ensures your material orders are exact and prevents mid-project delays.
At James Kate Roofing & solar, we build every estimate on honesty, integrity, and precision. As a family-owned DFW contractor backed by GAF President’s Club standards and up to 25-year workmanship warranties, we provide detailed, transparent takeoffs for every project we manage. If you are comparing quotes or getting ready to replace your roof across Mansfield, Arlington, Granbury, Grand Prairie, or Midlothian, learning how to measure a roof yourself to get an accurate quote ensures your home is protected with precision from day one.

Dustin Eatman is a seasoned roofing professional with deep, hands-on expertise that spans residential and commercial roofing, insurance solar, and long-term roof asset management. As the owner of James Kate Roofing & solar in the Dallas–Fort Worth metroplex, he’s built a reputation for diagnosing roof systems accurately, communicating clearly, and executing projects with a high standard of workmanship and documentation. Dustin understands the technical details that make roofs perform—proper underlayment selection, slope and drainage considerations, ventilation strategy, flashing and penetration detailing, and manufacturer-specific installation requirements—because he’s worked through the real-world challenges that cause leaks, premature wear, and warranty issues. He’s equally fluent in the operational side of roofing: jobsite planning, quality control, safety, material ordering, crew coordination, and customer experience from inspection to closeout. In insurance-related projects, Dustin brings practical knowledge of claim workflows, adjuster meetings, scope alignment, supplements, and the importance of photo evidence and thorough records, helping property owners navigate stressful situations with confidence. For commercial clients—especially property and facility managers—he emphasizes proactive maintenance and targeted repairs that reduce disruption, extend roof life, and prevent expensive interior damage. Dustin also stays focused on doing things the right way: educating customers on realistic options, setting expectations, and prioritizing solutions that hold up over time rather than quick fixes. That blend of technical skill, field experience, process discipline, and owner-level accountability is what makes Dustin Eatman a trusted expert in the roofing industry.