
How to Find the Hidden Source of a Shingle Roof Leak
To perform an effective asphalt shingle roof leak repair, locate the leak’s origin by tracing moisture trails uphill in the attic, secure the breach temporarily with wet-patch mastic or a taut tarp, and complete a permanent fix by mechanically replacing damaged shingles or corroded flashing. Water rarely travels straight down; gravity pulls moisture along decking, rafters, or conduits before dripping onto drywall.
When dealing with water intrusion, avoid guessing or spreading caulk blindly. Reviewing our guide to fixing a roof leak will help you understand the structural flow of water before you climb into your attic or onto the roof deck.
Inspecting the Attic for Rafter Trails and Shiners
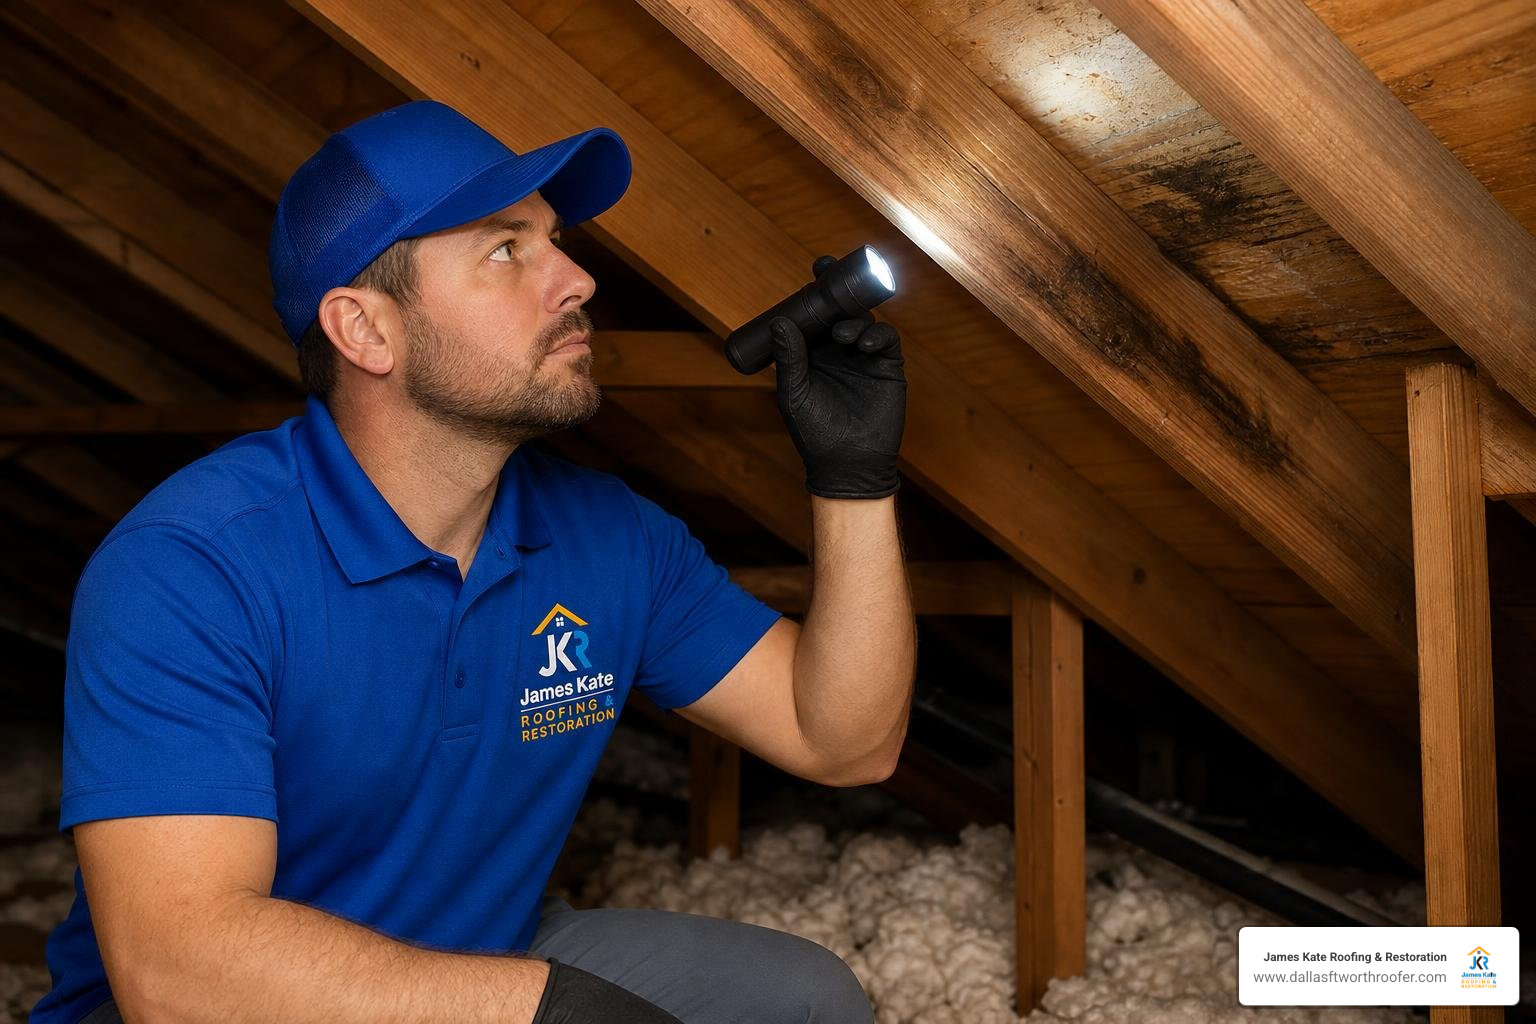
Your attic offers the clearest clues for tracking water intrusion. Head up with a bright flashlight during or immediately after a rainstorm. Step only on secure joists or catwalks, never on the drywall between them.
Look for these key indicators:
- Dark streaks and moisture trails: Follow dark water stains on the underside of the plywood or OSB roof sheathing uphill toward their highest point.
- Damp insulation: Fiberglass insulation mats down and discolors when wet. Compressed, dirty-looking insulation patches often sit directly beneath active drip points.
- Shiners (exposed roofing nails): Nails that missed the rafters during installation protrude through the decking into the attic space. In cold weather, warm indoor air condenses on these exposed metal points, creating frost or rust that drips water even without a roof breach.
- Mold or mildew growth: Clustered black or white mold spores along a rafter indicate long-term, slow moisture seepage.
Following these methods to find and fix asphalt leaks allows you to pinpoint the exterior zone requiring attention without guessing.
Isolating Entry Points with the Garden Hose Test
If you cannot find the leak visually during dry weather, simulate a rainstorm using a standard garden hose. This test requires two people: one on the roof with the hose and an observer in the attic with a flashlight and a phone or radio.
Begin at the lowest point of the suspected roof slope. Run a low-pressure, steady stream of water over a localized 3×3 foot section for at least 10 minutes. Do not spray upward under the shingle tabs—mimic natural falling rain. The observer in the attic watches for the first sign of active moisture. If no water appears after 10 minutes, move the hose slowly uphill and toward adjacent penetrations, testing one zone at a time. The moment moisture breaks through inside, mark the exterior location immediately.
Emergency Triage: Stopping Active Water Intrusion Fast
An active leak requires immediate interior and exterior damage control. Delaying action turns a minor patch into an expensive solar project. A 24-hour active leak typically causes between $300 and $1,500 in localized repairs, whereas water allowed to seep for six weeks can rack up $2,500 to $8,000 in structural framing and drywall remediation.
Start inside your living space:
- Place a large catch bucket beneath the drip.
- If your ceiling drywall is bubbling or sagging with trapped water, use a screwdriver or utility knife to puncture the center of the bulge. This relieves hydraulic pressure, preventing a sudden, catastrophic drywall collapse and channeling the water directly into your bucket.
- Move furniture, rugs, and electronics out of the splash radius.
Applying Wet-Surface Sealants in the Rain
If outdoor conditions prevent a full repair, an emergency patch can halt water entry until dry weather arrives. Standard roofing cement will not stick to saturated shingles, but specialized rubberized wet-patch sealants (formulated to meet ASTM D3409 standards) adhere directly to wet substrates, even under standing water.
To execute a temporary three-course patch:
- Clear loose debris, leaves, and standing water from the breach area with a stiff brush or rag.
- Using a trowel or putty knife, spread a 1/8-inch layer of rubberized wet patch over the crack or split, extending two inches beyond the damaged area.
- Embed a strip of fiberglass roofing reinforcement fabric directly into the wet mastic.
- Apply a second 1/8-inch layer of wet patch over the fabric, smoothing the edges flat against the surrounding shingle material.
Proper Roof Tarping Techniques to Prevent Interior Damage
When widespread shingle loss occurs during severe storms in communities like Mansfield, TX, a heavy-duty woven polyethylene tarp provides dependable temporary protection for 30 to 45 days.
To secure a tarp safely without causing additional roof punctures:
- Size the tarp correctly: Ensure the tarp extends at least four feet beyond the damaged zone on all sides and wraps over the roof peak (ridge) by at least three to four feet to prevent wind from catching the top edge.
- Use 2×4 furring strips: Never nail directly through the body of the tarp. Wrap the edges of the tarp around 2×4 wooden boards, then nail or screw the wood into the roof deck. The wood creates continuous clamping pressure that resists high winds.
- Keep it taut: Pull the tarp tight across the roof surface to prevent low spots where water can pool and seep through screw holes.
- Safety first: Never climb onto a wet, high-pitch roof during an active thunderstorm. Tarping should only be attempted when wind speeds subside and the surface is safe to navigate.
Permanent Asphalt Shingle Roof Leak Repair by Component
Permanent roof repair requires mechanical component replacement rather than topical sealants. Approximately 90% of all asphalt shingle roof leaks occur where the field of shingles meets an edge, transition, or penetration—such as a pipe boot, chimney, dormer wall, skylight, or valley. A proper mechanical repair lasts 10 to 20 years, whereas a simple topical caulk patch typically degrades within 18 to 24 months under sun exposure and thermal expansion.
Consult an industry standard leak repair guide for comprehensive mechanical principles before starting structural repairs.
Tools and Materials for Asphalt Shingle Roof Leak Repair
Gather the proper roofing tools before starting your project:
- Flat roofing pry bar (flat bar or wonder bar)
- Roofing hammer or pneumatic coil roofing nailer
- 1-1/4 inch hot-dipped galvanized roofing nails
- Hook-blade utility knife
- Polyurethane or tripolymer roof sealant (avoid standard silicone, which breaks down on asphalt)
- Asphalt roofing cement
- Replacement shingles matching your existing profile
- OSHA-compliant safety harness, roof anchor, and rope grab for steep pitches
Replacing Damaged, Cracked, or Missing Shingles
Wind gusts, fallen branches, and hail impacts can crack, tear, or blow away individual shingles. When single tabs or full shingles fail, moisture accesses the underlayment and decking beneath.
Follow these steps for proper shingle replacement:
- Break the adhesive seal: Gently slide a flat pry bar beneath the damaged shingle tab to break the factory sealant strip. Also loosen the tabs directly above the damaged piece, as the nails holding the damaged shingle pass through the top edge of the course below it.
- Remove the fasteners: Slide the flat bar under the damaged shingle, align the bar notch with a nail shank, and lift upward. Press down on the shingle face with your free hand while pulling the pry bar to pop the nail head through the shingle without ripping the deck. Remove all four to six nails holding the broken piece.
- Slide out the damaged shingle: Pull the broken piece out horizontally. Clean away any loose granules or torn underlayment beneath it.
- Insert the replacement: Slide a new shingle into position, aligning its exposure and bottom edge with the adjacent shingles. For complete guidance on tab alignment, read how to replace damaged shingles.
- Fasten securely: Drive new 1-1/4 inch galvanized roofing nails 1/2 inch above the cutout slots, into the designated nail line. Never reuse old nail holes; offset your new nails by at least one inch.
- Reseal the tabs: Apply two quarter-sized dabs of polyurethane roofing sealant beneath each tab of the new shingle and press firmly downward to reactivate the wind-resistant bond.
Sealing Penetrations During Asphalt Shingle Roof Leak Repair
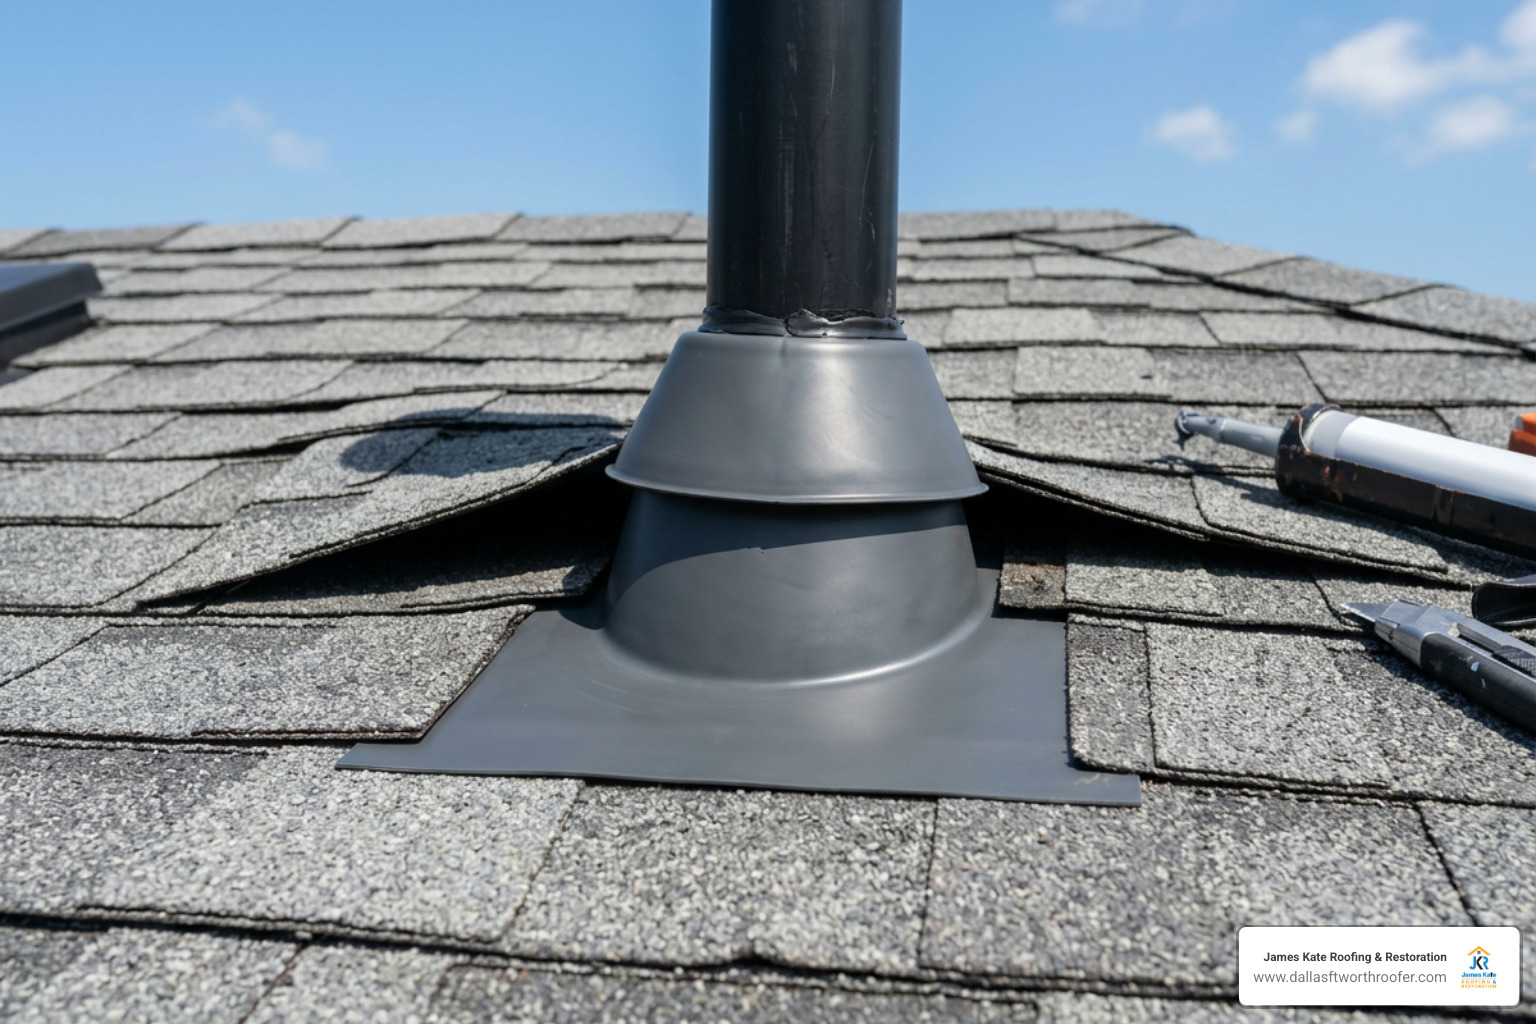
Penetrations represent the highest failure risk on residential shingle roofs:
- Plumbing Vent Boots: Vent pipe boots account for approximately 15% of all residential roof leaks. The neoprene or EPDM rubber collar surrounding the pipe dries out, cracks, and splits after 10 to 15 years of ultraviolet exposure. The fastest, most durable fix is installing a two-piece retrofit collar over the existing pipe or loosening surrounding shingles to replace the entire flashing base.
- Step and Counter Flashing: Step flashing at sidewalls and dormers represents roughly 25% of all residential leaks. Each L-shaped step flashing piece must overlap the next by at least two inches, stepping up the wall beneath the siding. If flashing is rusted or unseated, remove surrounding shingles and replace the bent metal pieces.
- Chimneys and Skylights: Chimney systems require four distinct flashing components: continuous apron flashing at the front, step flashing along the sides, a cricket (saddle) or backer flashing at the rear, and mortar-embedded counter flashing over the top. Cracks in the mortar joint or separated counter flashing allow significant water intrusion.
- Valleys: Valley channels carry high volumes of runoff during downpours. Open metal valleys or closed-cut shingle valleys that split due to foot traffic or ice buildup require new self-adhered waterproof underlayment and re-shingling. Reviewing the cost to fix a small roof leak can help you plan your budget when addressing these penetration points.
Repair vs. Replacement: Evaluating Costs, Lifespans, and Insurance
Every roof reaches a point where continuous patching costs more than a comprehensive replacement. Deciding between a minor fix and a new roof system comes down to roof age, granule retention, and the geographic extent of moisture intrusion.
Keeping up with comprehensive roof maintenance helps extend the life of your roof, but you must know the financial and structural thresholds that dictate replacement.
2026 Cost Breakdown: DIY vs. Professional Labor
Typical residential roof leak repairs in 2026 range from $300 to $1,500, with a national median cost between $600 and $850. DIY repairs carry a low material cost but require strict adherence to fall-protection safety protocols.
| Leak Type / Repair Scope | Typical DIY Material Cost (2026) | Professional Repair Range (2026) | Expected Longevity (Proper Fix) |
|---|---|---|---|
| Single Shingle Replacement | $30 – $60 | $200 – $450 | 15 – 25 Years |
| Plumbing Vent Boot Replacement | $25 – $50 | $250 – $500 | 10 – 15 Years |
| Wall / Dormer Step Flashing | $60 – $120 | $500 – $1,200 | 15 – 20 Years |
| Chimney Flashing & Cricket Rebuild | $150 – $350 | $900 – $2,500 | 20+ Years |
| Valley Re-lining & Shingle Rework | $100 – $250 | $800 – $2,200 | 15 – 20 Years |
| Emergency Tarping & Board-Up | $50 – $120 | $350 – $800 | 30 – 45 Days (Temporary) |
When to Stop Patching and Opt for Full Replacement
If your asphalt shingle roof is under 12 years old and the leak is confined to a single failed boot or a few loose shingles, a localized repair is your best financial move.
However, consider an asphalt shingle replacement when you encounter:
- Widespread granule loss: Bald asphalt patches and gutters choked with granules indicate the protective layer has eroded.
- Brittle shingles: If lifting a tab to slide a pry bar underneath causes the shingle to crack across its top edge, the asphalt binder has dried out, making localized repairs counterproductive.
- Multiple active leaks across separate planes: Leaks occurring simultaneously in valleys, ridges, and open decking indicate systemic underlayment failure.
- Extensive decking rot: When moisture penetrates large sections of OSB or plywood decking, structural stability is compromised, requiring complete tear-off and re-sheathing.
Navigating Homeowner Insurance Claims for Storm Damage
Homeowner insurance policies generally cover roof repairs if the leak results from a sudden, accidental peril—such as severe hail, high straight-line winds, or a fallen tree branch. Policies routinely exclude gradual wear and tear, deferred maintenance, or manufacturer defects.
To file a successful insurance claim:
- Document immediately: Take detailed, clear photographs of the interior ceiling damage, attic leaks, and exterior roof damage before touching anything.
- Mitigate ongoing losses: Insurance contracts require homeowners to take reasonable steps to prevent secondary water damage. Save all receipts for tarps, buckets, and emergency leak services.
- Schedule a professional inspection: Before the adjuster arrives, obtain an independent assessment from an experienced local roofer. Utilizing a routine DFW roof inspection gives you an itemized report documenting the precise storm-related cause of your roof leak.
Frequently Asked Questions About Roof Leak Repairs
Can I fix a shingle roof leak from inside the attic?
No. Spraying foam, applying caulking, or attaching plastic sheeting inside your attic does not fix a roof leak. Water enters from the outside; blocking it from below traps moisture inside the wood decking, rafters, and insulation. This causes rapid wood rot, delaminates the plywood, and fosters hidden mold growth while the water finds a new path into your ceilings. All lasting repairs must be completed on the exterior roof surface.
How long does a typical shingle patch last compared to a permanent repair?
A temporary patch using roof mastic, silicone caulk, or wet-patch cement typically lasts between 6 and 24 months. Ultraviolet (UV) rays and temperature swings break down the petroleum solvents, causing the mastic to shrink, dry out, and crack. In contrast, a mechanical repair—where damaged shingles or flashing components are completely replaced and secured with hot-dipped galvanized fasteners—restores the system’s integrity for 10 to 20+ years.
Why does my asphalt shingle roof leak only during heavy driving rain?
A roof that stays dry during vertical showers but leaks during high-wind storms usually has an issue with flashing overlaps or unsealed shingle tabs. Wind-driven rain drives moisture horizontally, pushing water up under loosened shingle edges, into unsealed step-flashing side laps, or behind siding at wall junctions. It can also force water through failed pipe boot seams or overflow valley channels that are partially blocked with debris.
Conclusion
A leaking roof demands prompt, informed action. By understanding how water migrates, performing emergency triage safely, and opting for mechanical component replacement over superficial caulk, you protect your home’s structural framing, insulation, and interior finishes.
When a leak exceeds standard DIY capabilities—or if your roof pitch poses a safety concern—partnering with a dedicated team ensures your home remains secure. At James Kate Roofing & solar, we bring family-owned dedication, GAF President’s Club standards, and deep technical expertise to every project across Arlington, TX, Grand Prairie, TX, Granbury, TX, and Midlothian, TX. Whether you need an emergency response, precision flashing reconstruction, full solar, or long-term structural repairs backed by our 25-year workmanship warranty, James Kate Roofing & solar is ready to keep your home dry and structurally sound.

Dustin Eatman is a seasoned roofing professional with deep, hands-on expertise that spans residential and commercial roofing, insurance solar, and long-term roof asset management. As the owner of James Kate Roofing & solar in the Dallas–Fort Worth metroplex, he’s built a reputation for diagnosing roof systems accurately, communicating clearly, and executing projects with a high standard of workmanship and documentation. Dustin understands the technical details that make roofs perform—proper underlayment selection, slope and drainage considerations, ventilation strategy, flashing and penetration detailing, and manufacturer-specific installation requirements—because he’s worked through the real-world challenges that cause leaks, premature wear, and warranty issues. He’s equally fluent in the operational side of roofing: jobsite planning, quality control, safety, material ordering, crew coordination, and customer experience from inspection to closeout. In insurance-related projects, Dustin brings practical knowledge of claim workflows, adjuster meetings, scope alignment, supplements, and the importance of photo evidence and thorough records, helping property owners navigate stressful situations with confidence. For commercial clients—especially property and facility managers—he emphasizes proactive maintenance and targeted repairs that reduce disruption, extend roof life, and prevent expensive interior damage. Dustin also stays focused on doing things the right way: educating customers on realistic options, setting expectations, and prioritizing solutions that hold up over time rather than quick fixes. That blend of technical skill, field experience, process discipline, and owner-level accountability is what makes Dustin Eatman a trusted expert in the roofing industry.