
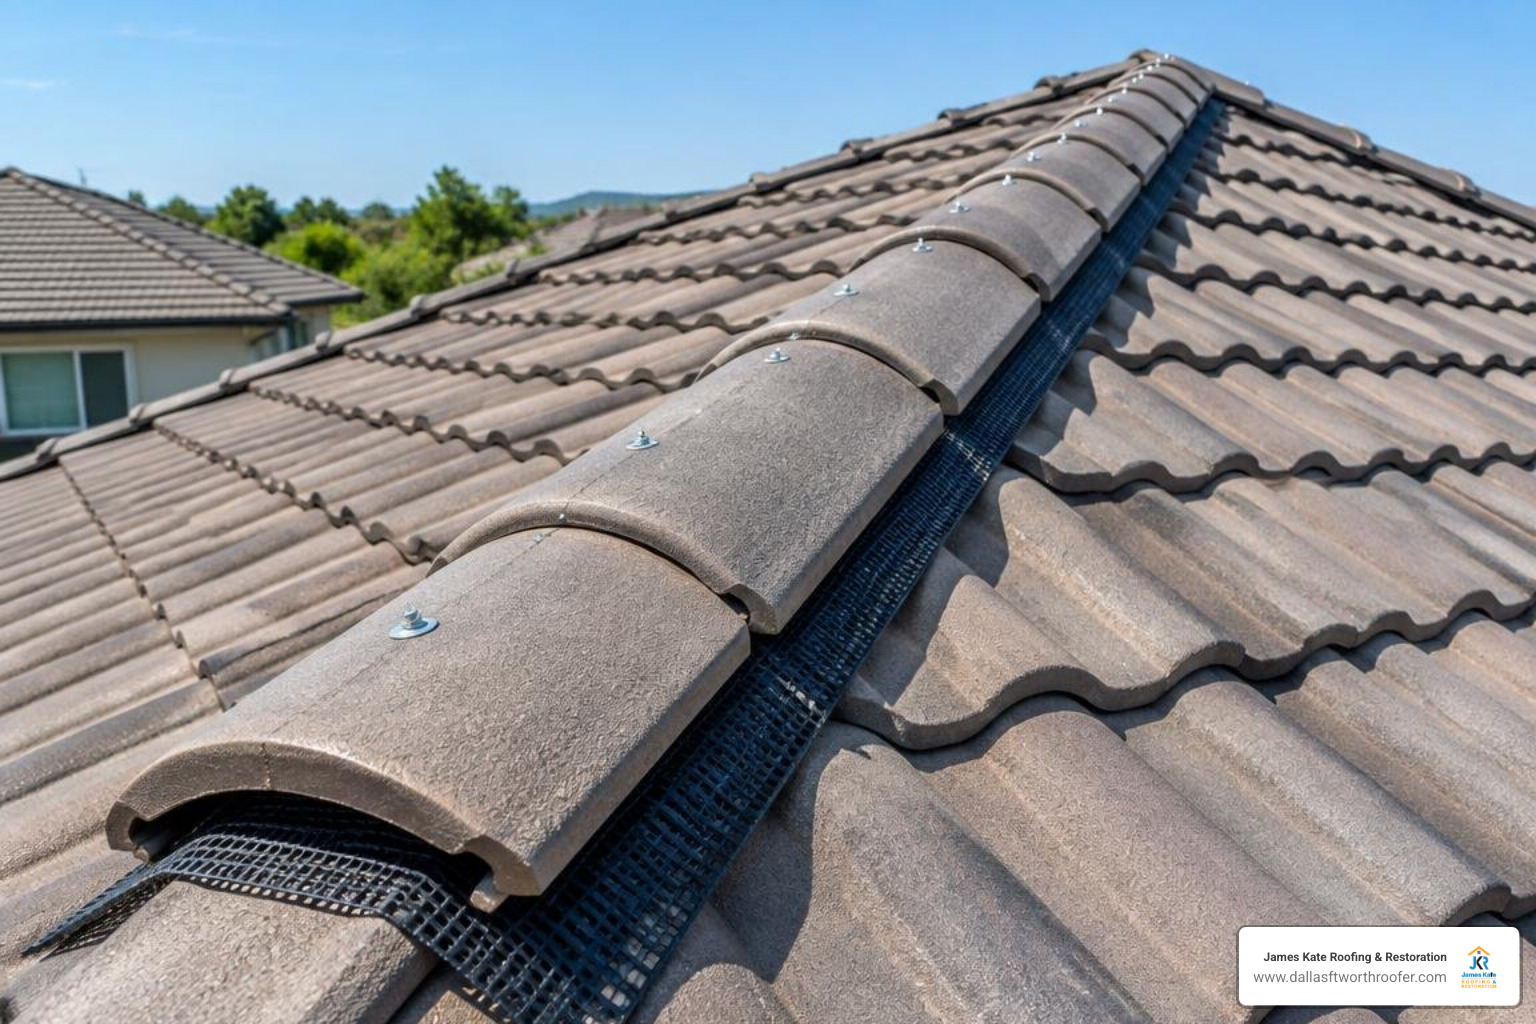
How to Install a Dry Ridge System
On a compatible tile roof, start by securing a ridge batten and preparing the underlay for the ventilation the system requires. Center the ridge roll, press its adhesive edges onto clean, dry tiles, then fit the ridge tiles and unions. Secure each tile with the kit’s specified screws, washers, and clamps, following its instructions for spacing and end tiles.
Unlike mortar, mechanical fixings hold the ridge tiles in place without relying on a bed that can crack over time. A ventilated system can also let air escape at the roof peak without leaving an open path for rain.
I’m Dustin Eatman, owner of James Kate Roofing & solar. My experience with tile roofs, ventilation, and manufacturer-specific roof details informs this guide to dry ridge system installation.
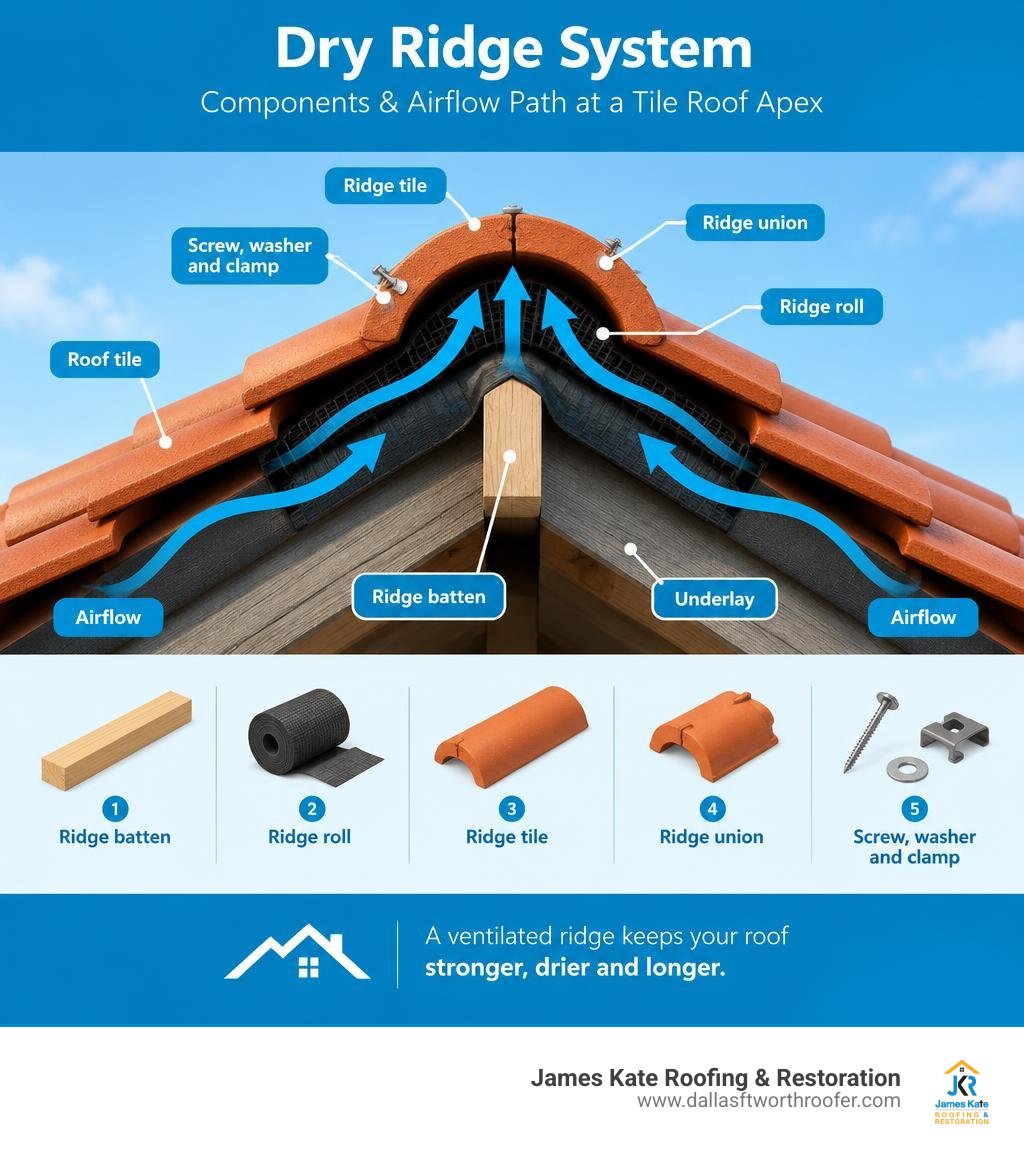
Dry ridge system installation vocab to learn:
Why Upgrade to a Modern Dry Ridge System?
For decades, wet mortar bedding was the standard way to fix ridge tiles along the apex of a roof. If you have ever walked around older neighborhoods in Arlington or Mansfield, you have likely seen the results of aged mortar: crumbling gray cement, missing chunks, and ridge tiles that have shifted dangerously out of line.
Mortar is rigid. Roof structures naturally expand, contract, and flex under fluctuating temperatures and strong Texas wind gusts. Over time, that structural movement causes mortar beds to crack and lose adhesion. Once water penetrates those hairline fractures, freeze-thaw cycles and severe heat accelerate the breakdown. A mechanical dry ridge assembly replaces wet mortar entirely with engineered clamps, screws, and flexible seals that accommodate roof movement while locking every single tile into place.
When upgrading high-performance tile roofing, switching to a mechanical dry fix assembly delivers immense durability and airflow benefits compared to old-school cement bedding.
| Feature / Metric | Traditional Wet Mortar Bedding | Mechanical Dry Ridge System |
|---|---|---|
| Fixing Method | Chemical bond via sand-and-cement mortar | Mechanical stainless steel screws & clamping plates |
| Flexibility | Brittle; prone to cracking under thermal movement | Flexible; absorbs structural settlement and expansion |
| Ventilation | Completely sealed (blocks passive airflow) | Built-in continuous high-level ventilation (minimum 5mm) |
| Maintenance | Requires frequent repointing and mortar repair | Virtually maintenance-free over its service life |
| Weather Resistance | Susceptible to frost damage and wind uplift | High uplift resistance; storm and wind driven rain-tested |
| Installation Speed | Slower; dependent on dry, mild curing conditions | Fast; all-weather installation without mixing mess |
Essential Components of a Dry Fix Assembly
A dry fix ridge setup combines several precision-engineered components designed to provide physical strength and moisture protection:
- Ventilated Ridge Roll: A flexible composite roll featuring a breathable, vapor-permeable center strip (typically 270 g/m² permeability) flanked by corrugated, coated aluminum or lead-free flashing edges. It stops driven rain and nesting pests while letting hot air exhaust continuously.
- Peelable Butyl Adhesive Strips: High-density adhesive strips along the roll edges that mold into the contours and profiles of concrete or clay roof tiles.
- Ridge Batten Straps (Brackets): Galvanized steel or heavy-duty polypropylene brackets mounted to apex rafters to elevate and firmly position the timber ridge runner batten.
- Universal Ridge Unions: Interlocking plastic gaskets or cross-couplings placed between adjacent ridge tiles. They cushion the joints, maintain uniform tile spacing, and direct surface runoff away from fixing holes.
- Clamping Plates & Neoprene Washers: Specially contoured metal plates and weather-sealing washers that distribute holding pressure across tile edges without cracking the tile substrate.
- Stainless Steel Fixing Screws: Corrosion-resistant fasteners (typically 100mm to 120mm A2 Torx or hex screws) driven directly through the clamping plates and unions into the timber ridge batten.
Step-by-Step Guide to Dry Ridge System Installation
Proper installation requires methodical planning from the roof rafters up to the final ridge caps. Following manufacturer specifications guarantees that your roof stays weathertight and structurally sound.
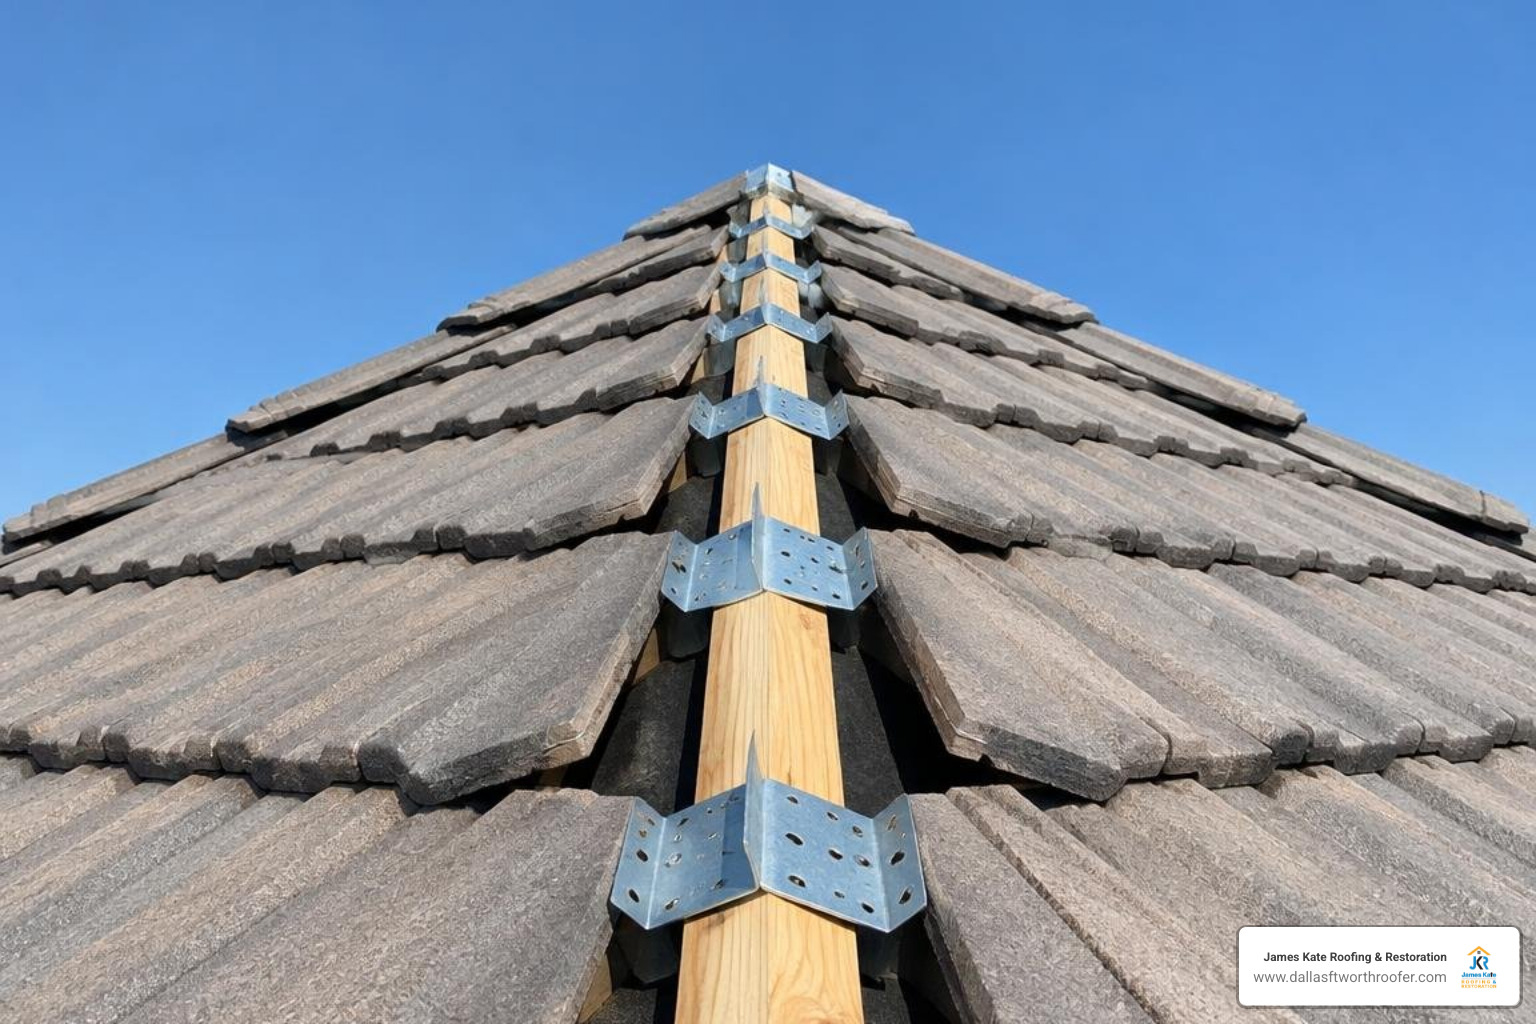
Preparing the Roof Apex for Dry Ridge System Installation
Preparation is the key to creating an uninterrupted ventilation path:
- Trim the Underlay Membrane: Lay your roofing underlayment across both roof pitches. To ensure active airflow, do not overlap the underlay solidly over the apex. Slice the membrane along the apex center line to establish a continuous air gap of at least 10mm (or set back each side approximately 30mm from the apex apex).
- Mount Ridge Batten Brackets: Fasten galvanized ridge batten straps across the apex rafters at maximum 600mm centers. Fix each strap securely to the timber trusses using a minimum of two 25mm clout nails per side.
- Install the Timber Ridge Runner Battens: Insert 50mm x 25mm treated timber battens into the brackets. Adjust the height of the runner battens so that when a ridge tile rests on top, a minimum 40mm screw embedment can be achieved without lifting the tile edges off the roof surface. Consult the Condron Dry Ridge System Installation Guide for specific strap-to-batten fastening tolerances.
- Tile Headlap Clearance: Lay the top course of field tiles, maintaining a minimum 75mm headlap over the roof pitch beneath the ridge line.
Laying and Dressing the Ventilated Ridge Roll
Once your timber runner battens are secure and the roof tiles are laid, install the ventilated roll:
- Center and Fasten the Roll: Roll out the ventilated ridge roll centrally along the ridge batten. Tack or staple the breathable center fabric along the top batten at 300mm intervals to keep it aligned. Ensure an overlap of at least 75mm where two roll segments meet.
- Clean Contact Surfaces: Make sure the top course of tiles is completely free of dust, grit, and moisture.
- Dress the Flexible Skirts: Peel away the protective backing tape from the butyl adhesive strips. Work from the center outward, dressing the corrugated metal edges tightly into the troughs and crowns of your roof tile profile.
- Mind Application Temperatures: High-grade kits, such as those detailed in the Klober Dry Ridge Kit technical specifications, perform best when installed between +5°C and +35°C (+40°F to +95°F), ensuring optimal butyl adhesion to tile surfaces.
Positioning and Securing Ridge Tiles and Unions
With the ridge roll dressed, secure the ridge tiles:
- Position the First Ridge Tile: Place the initial ridge tile onto the apex, starting from the gable end or hip junction.
- Slide the Ridge Union into Place: Fit a universal ridge union over the end of the tile. If you are using concrete tiles with integral lugs, select a union designed for lugs to ensure a snug fit.
- Insert the Neighboring Tile: Seat the next ridge tile into the open side of the union, leaving an even joint.
- Drive the Mechanical Fasteners: Place a metal clamping plate and sealing washer over the union’s central slot. Insert a 120mm A2 Torx-headed screw through the clamp and drive it down through the union, penetration slot, and roll into the ridge runner batten.
- Verify Penetration Depth: Ensure the screw penetrates the timber batten by at least 40mm. Tighten firmly until the clamping plate holds the tile securely without over-torquing or cracking the tile edges.
Managing Ridge Terminations, Hips, and Gable Ends
The ends of the ridge require extra care to prevent wind entry and water infiltration:
- Gable Ends and Verge Details: At open verges, finish the apex with a factory-molded block-end ridge tile or fit a dedicated mechanical dry verge end cap. Fasten the final tile with a double-fixing method—securing both the inner union joint and the outer exposed terminal face.
- Hip Junctions: When running a dry system down hips, fit continuous hip support trays (1200mm lengths) beneath the roll to prevent sagging between battens.
- Wall Abutments: Where the ridge terminates against a vertical wall, dress the ventilated roll up the wall by at least 75mm and install stepped lead or metal counter-flashing over the junction, sealing all seams with high-grade butyl sealant.
Building Codes, Standards Compliance, and Best Practices
Modern roofing standards place heavy emphasis on roof ventilation and mechanical fixing to protect homes against extreme weather events.

When planning a complete roof replacement and installation, selecting materials that comply with recognized building codes protects your home’s structural integrity.
Critical Standards Governing Dry Ridge System Installation
To deliver lasting performance, modern dry fix kits comply with rigorous testing benchmarks:
- BS 5534 (Mechanical Fixing of Slates and Tiles): Eliminates reliance on mortar alone for securing apex tiles. It mandates that all ridge and hip tiles be mechanically secured to resist calculated wind uplift forces.
- BS 5250 (Code of Practice for Control of Condensation in Buildings): Specifies requirements for attic and roof space ventilation. A compliant dry ridge system provides a continuous air gap equivalent to a continuous 5mm slot along the apex.
- BS 8612 (Performance Requirements for Dry-Fix Roofing Systems): Governs mechanical resistance to wind uplift, water penetration under driving rain, and mechanical durability of plastic unions and butyl seals, as highlighted in modern Dry Fix Ridge Kit specifications.
Common Installation Mistakes to Avoid
Even quality components will fail if installed incorrectly. Avoid these common errors:
- Blocking Apex Underlay Gaps: Failing to leave the required 10mm gap in the underlayment prevents warm air from reaching the ridge exhaust channels. If you are troubleshooting attic airflow issues, see our guide on poor roof ventilation.
- Insufficient Screw Penetration: Using short screws that penetrate the ridge batten by less than 40mm leaves tiles vulnerable to high winds.
- Pressing Butyl on Wet or Dusty Tiles: Attempting to adhere the roll skirt onto unwashed or damp tiles prevents the butyl adhesive from bonding properly.
- Overtightening Clamping Plates: Cranking fasteners down with excessive torque can crack tile edges or snap union clips.
- Omitting End Fixings: Leaving the first and last ridge tiles secured by only a single clamp leaves roof edges exposed to wind lift. If you are comparing attic ventilation setups, read our breakdown on whether ridge vents are right for your roof.
Frequently Asked Questions About Dry Ridge Systems
Can a dry ridge system be installed in cold or wet weather?
Yes, mechanical components can be fitted in cold weather. However, the butyl adhesive strips require dry, clean surfaces to bond properly. If you are installing below +5°C (+40°F), warm the adhesive edges gently with a heat gun to ensure a tight bond with the tile contours.
How much continuous ventilation does a dry ridge system deliver?
Most standard kits provide continuous airflow equivalent to a 5mm slot along the ridge line. This continuous exhaust draws humid air out of your attic space, helping prevent attic condensation, reducing energy strain, and improving overall roof ventilation and indoor comfort. To balance your home’s intake and exhaust, check out our guide covering attic vents and roof ventilation.
Are mechanical dry ridge systems required on all new tile roofs?
Under modern building codes and standards like BS 5534, all ridge and hip tiles on new roofs must be mechanically fixed rather than relying solely on mortar beds. While existing mortar ridges can remain until they deteriorate, replacing them with a dry fix system is recommended during roof renovations.
Conclusion
Upgrading to a mechanical dry ridge system eliminates crumbling mortar beds, provides storm resistance against high winds, and adds continuous attic ventilation.
At James Kate Roofing & solar, we bring family-owned dedication, honest craftsmanship, and GAF President’s Club standards to homeowners across Mansfield, Arlington, Granbury, Grand Prairie, and Midlothian. Whether you need a small repair or a full tile roof replacement, our team backs every project with top-tier materials and workmanship warranties up to 25 years.
Ready to upgrade your roof with reliable dry fix solutions? Contact our Grand Prairie TX roofing team today for an expert roof inspection and estimate.

Dustin Eatman is a seasoned roofing professional with deep, hands-on expertise that spans residential and commercial roofing, insurance solar, and long-term roof asset management. As the owner of James Kate Roofing & solar in the Dallas–Fort Worth metroplex, he’s built a reputation for diagnosing roof systems accurately, communicating clearly, and executing projects with a high standard of workmanship and documentation. Dustin understands the technical details that make roofs perform—proper underlayment selection, slope and drainage considerations, ventilation strategy, flashing and penetration detailing, and manufacturer-specific installation requirements—because he’s worked through the real-world challenges that cause leaks, premature wear, and warranty issues. He’s equally fluent in the operational side of roofing: jobsite planning, quality control, safety, material ordering, crew coordination, and customer experience from inspection to closeout. In insurance-related projects, Dustin brings practical knowledge of claim workflows, adjuster meetings, scope alignment, supplements, and the importance of photo evidence and thorough records, helping property owners navigate stressful situations with confidence. For commercial clients—especially property and facility managers—he emphasizes proactive maintenance and targeted repairs that reduce disruption, extend roof life, and prevent expensive interior damage. Dustin also stays focused on doing things the right way: educating customers on realistic options, setting expectations, and prioritizing solutions that hold up over time rather than quick fixes. That blend of technical skill, field experience, process discipline, and owner-level accountability is what makes Dustin Eatman a trusted expert in the roofing industry.